I am going to see if I can do my first tutorial today. I love tutorials, so I would love to have heaps on my site. So bare with me and hopefully I explain everything well.
This is my finished book, ready to add photos.Dsp (Newspaper print): 9" x 12" score 9" side 41/2"
score 12" side 3", 6", 9"
Cut along 41/2" score line in-between 3" and 9" score lines.
This is what your 12" x 12" will look like.
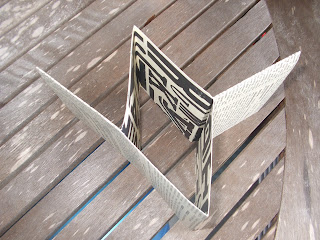
Then bend up the middle so it looks like a cross and then fold the pages down depending on where it is easiest for the book to lay. (the pages want to go a certain way so just keep playing with the pages until it sits perfectly the way you want it to)
A few photos showing you how to get the pages falling into a fold for your book.
Adhere your pages down, depending on whether you would like pockets or not. I love pockets so I, of course, gave every page a pocket.
Use 1" circle to cut 1/2 circles in pages to be able to take out tags easily. (make sure on the first and last pages that you only punch the inside circle otherwise your front and back will have a half circle for decoration.
Use the 3" x 12" (left over from your 12" x 12") for decoration along with card stock etc.
A little trick I learnt: when I don't have ribbon, I use card stock, and that is what I have used for the bow, I will quite often use it where ribbon is needed, if I don't have that ribbon required.
Decorating my pages ready for the photos. Now to start with my tags.
And, my decorated front and tags. I could give you my measurements for the tags but it depends on how you tape down your edges to allow a decent size tag in the pocket. All my tags are 4" x 21/2", and very easy to trim down if you have to.
I used the round tab extra lge punch for the tag ends and I used 5/8" very vanilla grosgrain ribbon to tie around the book at the end.
I have never used card stock for this book as it wouldn't be pliable enough to bend to make the book, but one day I may try and then I can tell you for sure.
I wish I could remember where I got these instructions but I went back on the net to find out and couldn't find the instructions anywhere. I actually pulled apart one of the other books I had made (yes, I have heaps, I love these books heaps) to get the instructions.
I hope you have fun playing with this and have a great day.


No comments:
Post a Comment