Monday, March 28, 2011

Happy Easter

Hello,
  Hope everyone has had a great day!  My week got off to a bad start but is getting better.  I have done two challenges in one today  (still not really up on ATC but anyway this is as good as it gets till I brush up on them - and it is on a card)  But anyway, let me explain what I have done, colours on Our Creative Corner (being made into an ATC - which is my middle bit) and a sketch on Inkspiration.  I am so happy with this one.  I feel like I am getting a little better at not overdoing it or putting too many of the wrong things together!!

So there is my card.  Maybe not the best photo in the world!!!!
Stamp set:  Easter Blooms (couldn't resist even though I just bought it)
Card:  Basic black, kraft, whisper white and kiwi kiss (retired colour)
Ink:  Basic black
Acc:  Crystal affects
Tools:  lge scallop oval, lge oval, scallop eyelet border punch, boho blossom punch
Thanks for stopping by and have a great night....

Chest Of Drawers

Hello,
  Yes it is evening, and guess what, I took my first night picture with my camera.  Maybe it is not as bad as I think.  Just joking, I still want a camera that makes everything clear and precise, and where I can focus on something specific.  That is definitely not my camera.  So tonight I did the Crafters Anonymous tutorial on-line and as always it is so much fun.  I always feel the pressure especially when my son won't leave me alone and wants to use the computer.  Easier to give in for peace of mind!  But here is my pictures, not that great but much better than what I was getting.  Sorry I can't give out the instructions but the tutorial is sold on the Crafters Anonymous site.

Stamp set:  Fox and friends
Card:  Tempting turquoise,  dsp - celebrations
Ink:  Old olive
Tools:  Square scallop punch and 1" circle punch
Have a lovely evening....
ps:  do you love what I have done with the page.  Well don't ask me how I did it, my computer was playing up tonight and wouldn't hurry up and download so I started pressing buttons (as you do!!) and this is what I ended up with.....

Sunday, March 27, 2011

Time To Party

Good morning,
  Well, after not doing any posts for a couple of days I am doing two this morning.  This one is a Pals Paper Arts Challenge which is all about embossing, so here is my card.

Now, you all know that making a card is a challenge for me so I hope you like this one, me, I'm not too sure!
Stamp set:  Party Hearty
Card:  Chocolate chip, certainly celery, pacific point, baja breeze and whisper white
Ink:  Chocolate chip, baja breeze, old olive and daffodil delight
Acc:  Dimensional, very vanilla ribbon
Tools:  Big shot, elegant lines and modern label extra lge
Thanks for stopping by and have a great day....

Another Male Card

Hi again,
  That didn't take long did it!  I have so much to do at the moment and so little time to do it in.  But here is my next challenge for Just Add Ink which is all about stamps and card.  No punches, die cuts (and you know how much I love those two things), embellishments, ribbon, pretty much nothing else.  So here is my card:

Stamp set:  Occasional quotes, sanded and so happy for you (level one hostess set)
Card:  Chocolate chip, not quite navy and river rock
Ink:  Chocolate chip and not quite navy
Acc:  Crystal effects and glue dots
Tools:  none allowed (he he)
Hope you like my card, see ya soon .......

Wednesday, March 23, 2011

Easter Chick Treat Bag

Good morning,
  I am so sorry I have missed a few days.  My intention, when I started the blog, was to post every day.  But I think I need to put one day aside to make lots of things ready to post during the week, as I can't keep up.  I have not studied in ages and ages, and I think it has taken a lot out of me.  So now that I have bored you with that bit of trivia, let me show you the cutest bag.  Of course I cased it (you will be surprised the day I actually come up with something myself - and that will be my motivation, to try)
  I just had a look at my pictures and I was going to do a tutorial for you.  So give me a minute and I'll organise myself.........
  Okay, I have myself organised now, so here we go:
  So here is our cute Chick Bag

  Sorry, forgot to tell you what you need:
  Dsp - 8 1/2" x 11"    scored at (8 1/2")  2 1/2" and 6"
                                  scored at (11")  4 1/2" and 6 1/2"
the rest is decoration but if you would like dimensions for these just let me know.
fold all score line as above.  There are four extra lines there that you need to make folds yourself.  On all four sides; fold the top line down to the score line.  You may need to practise this but once you have it, you will find it so much easier when making bags and boxes (like this).  I am going to be making quite a few more of these types of bags/boxes with instructions so start perfecting it now.
This is how it looks when you start to bring up the sides.  Tape down the edges, like where my fingers are and the same on other side and down the bottom.


  Just a couple of photos to show you what it will look like as you tape the top down.  I am going slowly this time for the visual people (me being one of them).

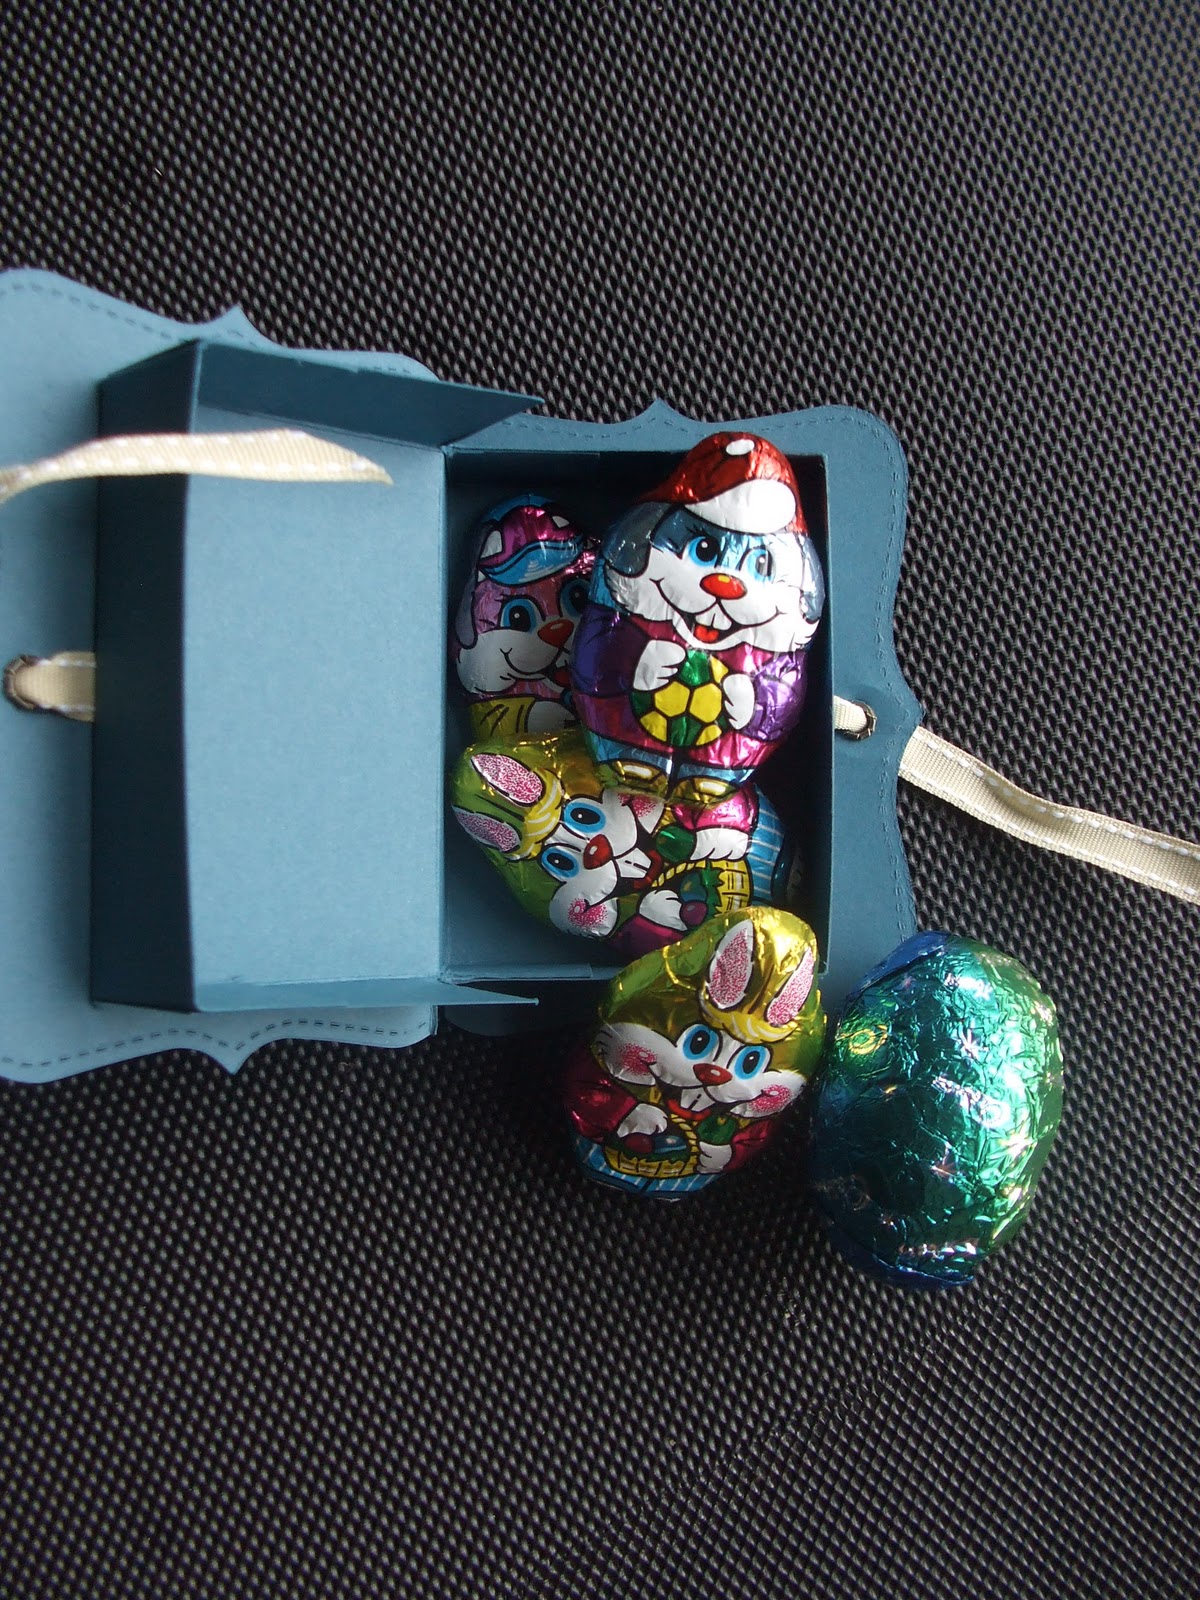
  See how cute it looks on the inside.  You can put so many different things in there.

  So this is what your bag will look like closed.  But now for the fun part of decorating.

  Like I said, if you would like me to get any of the measurements coming up, just let me know.  Before attaching the card stock of very vanilla I used the scallop edge punch  on one edge, and then decorated it before attaching to the back of my bag.

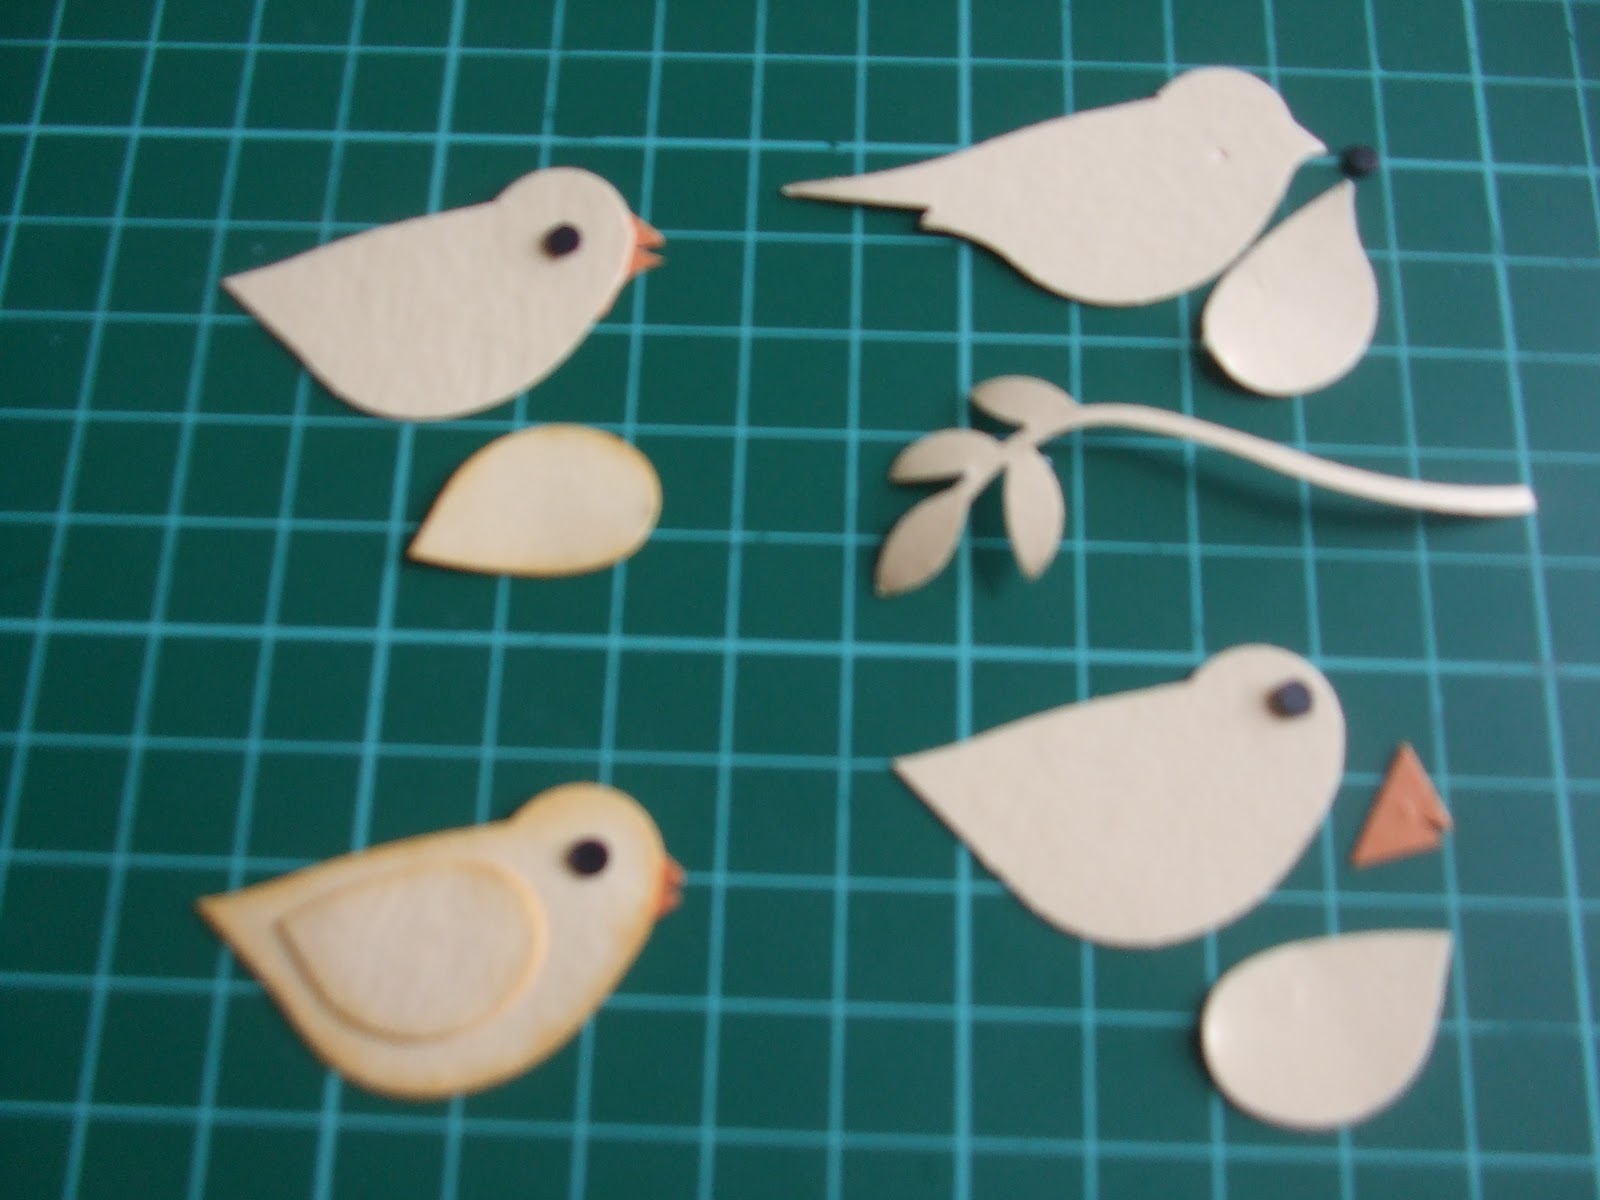
  I just used the two-step bird punch and the crop-a-dial (for his eyes.  And cut a little bit of peach parfait for his beak.

  I cut a strip of old olive and used my scissors to cut their grass.  I sponged the chicks and stamped my Happy Easter sentiment.  Then I added my favourite (and hard for me to use) flower brads.  I am so bad, I like to keep everything and not use it.  The good thing about Stampin' Up, is that it is teaching me to USE.


  So there you have it all finished.  I used the newspaper print as I really like it and thought it went well with Easter!  I cased this from the famous Angie Kennedy at Chic 'n Scratch.  She has always been one of my favourite blogs.
Stamp set:  Teeny tiny sentiments
Card:  Dsp - newspaper print, so saffron, old olive, basic black and peach parfait
Ink:  So saffron and basic black
Acc:  Flower brad and twine
Tools:  Two step bird punch, scallop edge punch, crop-a-dial and paper piercer.
Thanks for stopping by and if you have any queries please let me know.
Have a lovely day....

Friday, March 18, 2011

Fly Away With Me

Good morning,
  I am finding it harder to post every day, how people do that is beyond me, I take my hat off to you.  We have just been to soccer and played an unbelievable game.  The kids were so great, all passing the ball to each other, just the way it should be...
  I actually forgot I was posting my cards to go with my card holder so here they are:


Aren't they cute!!  I really like doing the 3 x 3 cards, only just started doing them but they are so easy to give as a gift then, and that is definitely what I like.
Hope you have a good day....

Wednesday, March 16, 2011

Cutest Ever 3 x 3 Card Holder

Good morning,
  I have the cutest ever card holder for you today.  I cased it from Teri who has some amazing and beautiful ideas.


  Tomorrow I will show you the cards I made to put in the holder, there are oh so cute (well I think so anyway).  My sister absolutely loves this, and let me tell you, that is amazing in itself.  I have been stamping for the last three years and there are only four things that my sister really loves, and this is one of them.  I will have to show you the others over the next couple of weeks to see what you think.  Personally, I love everything, no matter what!
  So I can give you some quick instructions but if you need more hop over to Teri's site as she has a tutorial on there.
1 top note        -  score in middle and then use crop-a-dial to punch two holes, on one side, to tie ribbon
                           (purely for decoration)
4 1/4" x 11"  Card            -     score 5", 6"
5" x 5 1/4"    card for pocket         -         score (5 1/4")      1" on both sides
                                                               score 5"               2" and 3"
Cut 1" from each of the edges on both sides, of your pocket.  That is the only cut markes you make.
Punch 1 1/4" half circle in middle of the front pocket and then adhere flaps to assemble pocket.
Make sure your ribbon is tied through the top note and then adhere to the back of the 4 1/4" x 11" card.  I dry embossed by front and back as I love, love this elegant lines folder.
Put adhesive on the back of your box and attach to the holder, making sure it will sit nicely inbetween the score lines.  (I did not put any adhesive on the bottom of the pocket though).
Now decorate your box and you are done.  Like I said I will post the pictures, tomorrow of my cards.
Card:  Pretty in pink, basic grey, whisper white
Acc:  Rhinestone brads, pink ribbon and twine
Tools:  Big shot, elegant lines, beautiful wings embosslits and 1 1/4" round punch.
Have a great day.....

Tuesday, March 15, 2011

3 x 3 Card Box

Morning,
  We are up bright and early, ready for a busy day.  I love all types of boxes and today I have a 3 x 3 box for you
I am still trying to keep to the Easter theme with my little bunny, even though it is not a traditional Easter box.  I have six cards inside but thought I could also put in a chocolate for Easter.   What is there not to love about Easter!

Just some nice, plain and simple cards.
I'll give you some simple instructions for the box but if you would like me to do a tutorial, just let me know.
Cut 71/2" x 71/2" card      score 2" on all sides.  This is your base
Cut 5 5/8" x 5 5/8"        score 1" on all sides.   This is your lid.
Fold and cut on four score lines to make box and lid, decorate. Like I say, if you would like a tutorial just let me know.  Have a lovely day....

Monday, March 14, 2011

Star Box

Good morning,
  I had such a fun time doing one of my favourite Monday night activities, Crafters Anonymous class.  We made a star box and even though mine didn't turn out the way it should of, it still looks alright.  I find when I do the classes I get nervous and feel rushed so it never works out the way I think it should.  But that is okay, nothing like putting yourself under a little pressure!
  So here is my box:

The instructions can be purchased through crafters anonymous.  If I put anything up and forget to write the instructions, please let me know.  Sometimes I am rushing and forget those things, but always willing to share what I have found.
Stamp set:  Eastern blooms
Card:  Chocolate chip, baja breeze, certainly celery, whisper white and dsp - greenhouse gala
Ink:  Old olive, baja breeze
Acc:  ribbon
Tools:  Lge flower punch
Have a lovely day.....

Sunday, March 13, 2011

Simply Birds

Good morning,
  I didn't think I would get this post in today, but guess what?  I did!  Surprise, surprise (definitely for me).  So another challenge, yes that is what I did on my Sunday, I love doing the challenges, really makes me think twice as much as normal.....
  Anyway, this is a clean and simple sketch, and like it says, it is clean and simple.

Stamp set:  Punch potpourri (level one hostess set)
Card:  whisper white, baja breeze, dsp - greenhouse gala
Ink:  Baja breeze
Acc:  Basic pearl jewels
Tools:  Big shot, dot to dot embossing folder, 2-step bird punch
I hope you like my card, have a lovely day...

Sassy Girl

Hello again,
  I decided I better do another post tonight as Monday's are always so busy now.  A lot more organising and rushing about.  So I did another challenge  Cooking it up with Katie which was: some sweet, A little sassy and finish with a punch.  And Cards and Things, with the colours of Certainly celery, old olive and marina mist.  So I hope you think I did all those things,
Stamp set:  Tote-ally tess
Card:  Certainly celery, whisper white, old olive and marina mist
Ink:  Marina mist, old olive
Acc:  Basic pearl jewels, marina mist ribbon
Tools:  Big shot, elegant lines embossing folder (love, love, love it), lge scallop oval, lge oval, heart to heart
           punches.
Oh, and I sponged all the edges with either marina mist or old olive, just to tie it all in together.
I hope you like my card and have a good night...

Saturday, March 12, 2011

Whimsy Challenge

Hi everyone,
  We are having such a lovely day today, overcast and showers outside and time to scrap inside.  Just the way I like it.  So, I have been busy with some challenges.  My first one actually has three challenges in one.  Don't worry, it nearly took me all day to do!!!  The first is Colour Q, the next is Pals Paper Arts and lastly is the sweetest thing.. (and it is closed, oh no, it took me too long to get my act into gear)  Oh well, I liked the sketch anyway.  So here is my card:
The Pals Paper Art was all about flowers and Colour Q was the colours of Daffodil delight, pumpkin pie, cool Caribbean (the closest I came to that was baja breeze), black and white.  So I think I have covered all that.
Stamp set:  Garden whimsy, occasional quotes
Card:  Whisper white, basic black, daffodil delight, pumpkin pie, baja breeze
Ink:  Daffodil delight, pumpkin pie
Acc:  stampin' glitter, eyelets
Tools:  Scallop eyelet border punch, 5 star flower and boho blossom punches
Hope you like it, have a great day...

Friday, March 11, 2011

Surfing Gift Card Holder

Hello,
  I am so out of whack it is not funny.  I thought I would post tonight as I am just as likely to forget tomorrow morning, the way I am going.  I made a really different gift card holder.  I found it from Artistic Avenger back in July of last year.  This is why I love having a blog.  It makes me get out all these things I have written up and finally make them.
I have taken a few photos so you can also see the insert pulled out.  I am really liking the idea of gift card holders as the kids are getting older, it is getting harder to find the right present.  What better than money or a gift card?  Goes down so well!!
Stamp set:  Just surfing
Card:  Always artichoke, not quite navy, river rock and whisper white
Ink:  Not quite navy
Acc:  River rock ribbon (retired)
Tools:  Scallop trim border and crop-a-dial
Thanks for dropping by....

Thursday, March 10, 2011

Easter Tags

Good morning,
  Yes, I forgot to post yesterday.  The night just got away on me and it was only when I was in bed that I had a light bulb moment.  But do you think I could drag myself out.....NO.  So sorry, now I will post:
  Aren't these just the cutest tags.  I saw these on Becky's site last year (Inking Idaho, link on the right) and fell in love with them.  Of course I changed it a little, but I love them.  Don't know who I am giving them to yet but I'm sure I will figure it out.
Stamp set:  Forest friends, inspired by nature
Card:  Whisper white, pink pirouette, rose red
Ink:  Old olive, chocolate chip
Acc:  Pretty in pink ribbon, whisper white ribbon
Tools:  Big shot, dot to dot and beautiful wings embossing folders, scallop circle punch and crop-a-dial
Have a lovely day....

Wednesday, March 9, 2011

Mother's Day Mini Album

Hi everyone,
  What a beautiful night and not too hot or raining!!  Always seems to be one or the other.  So today I have made a Mothers Day mini album.  I was on chic 'n scratch the other day and I always love what she makes.  And I use to make heaps of mini albums and unfortunately I have been a little slack.  So expect a lot more.  So I cased her album and here is mine,  I watched her live show for this but I am sure she probably now has a tutorial on u-tube.  Very easy to make and so quick and easy to whip up one for Mum..
I try to have all my instructions sitting here so I can quickly copy them on to the computer but goodness knows what I have done with them tonight!
Stamp set:  Priceless
Card:  Rose red, whisper white, old olive, dsp - newspaper print (I do love this one)
Ink:  Rose red
Acc:  Twine, kiwi kiss ribbon (retired- sorry I seem to use a bit of retired ribbon but I buy ribbon too late
          and then have to use it up).
Tools:  Scallop edge punch, scallop circle punch, 13/8" circle punch and my trusty crop-a-dial
Well I think that does it, so have a good night/day and thanks for stopping by....

Tuesday, March 8, 2011

House of Butterflys

Evening,
  I have another project from Brenda, Qbee's Quest, which is a little house.  My Mum, loves houses of all descriptions so I will give this to her with something small in it.
The second photo is showing you the side of the house and how wide it is.  There is a lot more you can do with the house, and don't you worry, I will be using this template again.  I want to play with it a lot more! Stamp set:  Friends 24-7, teeny tiny sentiments
Card:  River rock, whisper white, pink pirouette, rose red and old olive
Ink:  Old olive, pink pirouette and rose red
Acc:  Dazzling diamonds
Tools:  Big shot and beautiful wings embosslits
See you tomorrow......

Monday, March 7, 2011

Easter Top Note Box

Good evening,
  Yes, I seem to be on at nights now (for a little while anyway).  So I made this really cool little top note box, great tutorial on Angie's blog.
How cool does that box look with those chocolates?  Well I won't be putting any more chocolates with my creations........ there are none left!!!!  I tell you, I can not keep chocolate any more than a day, terrible!!  So I think I will have to stop buying them otherwise Easter Bunny will not bring me any.  He will think I have eaten more than enough, and of course, he would be right!
Stamp set:  Forest friends, teeny tiny sentiments
Card:  Not quite navy, dsp - greenhouse gala, river rock and whisper white
Ink:  Old olive and not quite navy
Acc:  Jumbo eyelets and river rock ribbon (retired)
Tools:  Big shot, top note die, sml oval, word window punch and crop-a-dial
Thanks for stopping by and have a lovely evening

Sunday, March 6, 2011

Mother's Day Butterfly Box

Hi Everyone,
  I hope you all had a lovely weekend.  I am sorry I have not posted but I started studying last week and it just took that bit out of me.  Don't worry, I think I am back on track, just needed to try and set up a routine.  I love posting everyday, so if I miss one here and there, just know I will try not to let it happen too often.
  So I realised that Mother's Day is so much closer to Easter this year and there would only be a week or two between them, so I thought I better get my act into gear.  So here is my first little project.  I love butterfly's and so does a good friend, Connie.  So I am surprising her with this:

  How beautiful is this?  I found the best blog the other day and she has heaps of templates, which of course, this is.  Brenda  is one of my new favourites, I love her blog and she shares so many tutorials and patterns.
So I didn't use any stamps here.
Card:  Baja breeze, dsp - greenhouse gala
Ink:  Baja breeze (sponging)
Acc:  Brads (for handle, attached to box/basket)
Tools:  Big shot, beautiful wings embosslits
Have a lovely night....

Wednesday, March 2, 2011

Brown bunny box

Good morning,
  I have another cute box for you and another cute bunny.  Who would have thought there were so many beautiful bunnies out there.  I'll have to try and design one myself before Easter arrives.

I cased this box from Mercedes, though she does not have a tutorial.
4 scallop envelopes out of cardstock -  box
3/4" x 8 1/4"  same colour cardstock  - handle
1 3/4" circle punch  -  body
1 1/4" circle punch  -  head
3/4" circle punch  -  cheeks and feet  (though I don't have 3/4 and used 1/2", which has come up okay)
1/2" circle punch  - tail
1/4" circle punch  -  eyes and nose
Lge oval punch  -  outside ears
Sml oval punch  -  inside ears
  Using the big shot , cut out the scallop envelopes and adhere together.  I cut off one of the tags on each box to adhere more neatly.  Tape the bottom of the box too.  There will be a tiny hole in the middle which you can cover up by cutting a square to adhere to the bottom.  Though I left mine the way it was.  As you can tell, I'm not a perfectionist!!!!
Now it is time to make your bunny, looking at his picture you can pretty much work out where to put all the pieces but if you have any problems, don't hesitate to let me know.
I tied ribbon around the box and tied a knot, didn't think it really need anything else.
I stuck two of the scallop edges down with glue dots. The other two were done when I put the handle and brads on.
Now put on your cute little rabbit, I just love him, he has to be one of my favourites
Have a lovely day....

Tuesday, March 1, 2011

Easter Box

Good morning,
  I have this cute little box, that could be called a basket.  Can't wait to use it!  And guess what??  It is so easy to make.


  Sorry I don't have any eggs in there but I have been buying them, just eating them as quickly.  I went to the shop and got some more so I'll see if they will last.  I am a chocoholic at heart!?!??!??!
You need:
4 3/4" x 7 3/4" piece of cardstock  -  box
1" x 11"  piece of card  -  handle
1 1/2" x 15" dsp to wrap around box, though I used 1 1/2" x 12" and used my punches for the gap
7/8" x 11" dsp to decorate the handle
  Adhere 7/8" dsp to 1" card for handle
  Score 11/2" on each side of the box
  Cut the cardstock at the two scored lines on either side of the long length (to the base of the box)
  Add tape to the four corners, remove and assemble box (making sure the tags go on the inside of the box.
  Decorate box with dsp and embellishments.
  Punch a hole with crop-a-dial or use your paper piercer if using small brads.  Attach handle to box and you are done.
There is also a tutorial on splitcoast stampers.
Stamp set:  Forst friends and teeny tiny sentiments
Card:  So saffron, old olive, whisper white and dsp - greenhouse gala
Ink:  Tangerine tango
Acc:  Designer brads
Tools:  Word window punch, scallop square punch, crop-a-dial or paper piercer
Have a great day....