hello,
I know, it has been so long and I am sorry. Life just got a little hectic for me and I know I have been saying that every time I get on here but I have truly missed coming on. I have made these bunnies before and seeing I had to make so many, 30 (for a class of students) I didn't go all out like I have done before. The funny thing is, it still took me two days (with a few interruptions along the way) to complete them. I had seen on pinterest where someone had put a magnet on the back and I liked that idea so hopefully the kids will take the egg off carefully and keep the bunny.
Don't tell me any different, I want to at least think they will have them for a day!!!
This is them all carefully put in a box ready to go to school, I meant to take a pic before I put them in the box!!!!
Just showing the magnet on the back
And hopefully a clearer picture.
I do have a few other things to show you before Easter so I will get on here again tomorrow night. Thank you for stopping by and have a lovely evening/day.....
Showing posts with label punch art. Show all posts
Monday, March 25, 2013
Saturday, December 29, 2012
Teacher Christmas Presents
Hello on this hot summery evening,
As I said, here are the presents that we gave to the teachers.
My favourite angels, yes, a lot of those went out this year, my favourite thing for the year actually. I made a box for them to go in and some chocolates at the end (always need some chocolate!)
Sorry, I should have started with this one first, but this is the front cover of the box, looked a little better in person, the colours don't look as good together in this photo!
And lastly my punch art pegs to put up Christmas cards. I have made a penguin, angel, reindeer, snowman and elf, love them. I should have made some for us too.
thanks for stopping by......
Thursday, December 20, 2012
Christmas Mouse Book Marks
Hello again,
I thought I would do a double post seeing I missed yesterday and I do have a few things to show you. I made some cute bookmarks for some special children I know and hopefully I will see them using them next year in their reading books...
Aren't these just the cutest! These were made using the ornament and owl punch for the face, eyes and nose. I used the three quarter and half inch for the ears. I used the square scallop punch for the white of the hat and cut a triangle freehand and added a flower from the itty bitty punches. I also used magnets inside the bookmark so they slip over the top and of course one of my favourite dsp Christmas packs.
Also in a blue, which I love. Oh I used the gel pen for the whites of his eyes.
Have a lovely evening/day.....
Reindeer Punch Art
I know, I was going to post every day till Christmas and then a visit to a friend got in the way!!!! But on to today's project... I made some punch art Reindeer's that are on numerous sites and so easy to make, love them, they are just so cute
Mainly made with the owl punch except for the horns which are the leaves from the bird punch and I drew on the mouth.
A close up of the Reindeer face and of course I picked out the one face that had a wonky eye (trust me, lol)
A close up of the bag and there is a very cute poem on the net but unfortunately my printer is playing up and I couldn't print it. I was making lots so didn't feel like hand writing that many..
And here are all my little bags for some work mates.
Thanks for stopping by......
Friday, April 13, 2012
Sick As A Dog
Hello,
We are still on school holidays which ends this week and it has been lovely. Before Easter one of my brothers was outside doing some work at Mum and Dad's and tried to chop one of his fingers off. He was actually hammering in some stacks and got distracted and lucky for him (even though he had a very squashed finger) the doctors managed to stitch the top of his finger back on. My lovely son and I felt so sorry for him, we are very lucky in our family and don't end up with many injuries, that we decided to make him a little gift and a card. So I jumped on the net (as you do) looking for something appropriate. I found this very cute dog that I cased from Rhea Anderson. So I made a card and a pouch to put chocolate in. Yes chocolate is a cure for everything! So here it is......
A decorated block of chocolate and card...
Ohhhhh, my little dog looks sad doesn't he.....
Wanted to give you a close up.....
And the cute card with his doggie tag around him.....
Just kept the inside plain with a bit of sponging, into the sponging at the moment....
And look how cute this card is. I love it, sponged all over the front. He doesn't like it but I told him it was very artistic....
And the inside, I was very impressed with his efforts....
I am just going to write down all the punches I used for the puppy.
Tongue and Nose - 1/4" circle red/black
Eye - 1/2" circle white
Black part of eye - 1/4" circle yes, black
Eyelids - 3/4" circle cut in half and the colour of the dog which is chocolate chip
Ears - Word window punch chocolate chip
Stomach - Lge oval kraft/soft suede
Body - Wide oval chocolate chip
legs - sml oval chocolate chip
Head - 1 3/4" circle chocolate chip
Mouth - lge oval cut and rounded off kraft/soft suede
Inside of mouth - a bit of a petal from 5 petal flower punch
I added the smallest circle from the crop-a-dial for his tongue
We are still on school holidays which ends this week and it has been lovely. Before Easter one of my brothers was outside doing some work at Mum and Dad's and tried to chop one of his fingers off. He was actually hammering in some stacks and got distracted and lucky for him (even though he had a very squashed finger) the doctors managed to stitch the top of his finger back on. My lovely son and I felt so sorry for him, we are very lucky in our family and don't end up with many injuries, that we decided to make him a little gift and a card. So I jumped on the net (as you do) looking for something appropriate. I found this very cute dog that I cased from Rhea Anderson. So I made a card and a pouch to put chocolate in. Yes chocolate is a cure for everything! So here it is......
A decorated block of chocolate and card...
Ohhhhh, my little dog looks sad doesn't he.....
Wanted to give you a close up.....
And the cute card with his doggie tag around him.....
Just kept the inside plain with a bit of sponging, into the sponging at the moment....
And look how cute this card is. I love it, sponged all over the front. He doesn't like it but I told him it was very artistic....
I am just going to write down all the punches I used for the puppy.
Tongue and Nose - 1/4" circle red/black
Eye - 1/2" circle white
Black part of eye - 1/4" circle yes, black
Eyelids - 3/4" circle cut in half and the colour of the dog which is chocolate chip
Ears - Word window punch chocolate chip
Stomach - Lge oval kraft/soft suede
Body - Wide oval chocolate chip
legs - sml oval chocolate chip
Head - 1 3/4" circle chocolate chip
Mouth - lge oval cut and rounded off kraft/soft suede
Inside of mouth - a bit of a petal from 5 petal flower punch
I added the smallest circle from the crop-a-dial for his tongue
Friday, April 6, 2012
My Second Post For Today - Orange Bunny Carrot
Hello again,
With this post I did not leave myself enough time to make a card so hopefully if I get it made tomorrow, I will show you. Again I have used orange a lot as it is all about carrots!! I have put this little bunny together without really casing from anyone as I have made so many different ones in the past, so it was just putting the punches together and I must say I do like using the ornament punch as the head, so cute.
I really like the petal cone die and I expect I will be using it heaps more now that I have it.
Stamp set: Everybunny
Card: Pumpkin pie, whisper white (sponged), basic black, dsp - brights
Acc: Brights brads
Tools: Petal cone die, Big shot, ornamental punch, lge and small oval punches, wide oval punch, 1 1/4" circle punch, 3/4" punch, 1/4" punch, 2 different size circles from 2 step owl punch and heart to heart punch. The green leafy bit is just strips cut down a piece of card and attached in the centre.
Have a really lovely night and thanks again for popping in.......
My First of Two Posts - Today! Easter Bon Bon and Card
Happy Easter everyone,
We spent the day with friends and it was so relaxing and lovely, talk about seafood and lots of it. All very nice and I didn't over-indulge, don't you love that! So this is the first post I will be doing and it is of a gorgeous duck I have been wanting to case for awhile and finally got around to doing it. Sorry I don't have the name as I just took the picture and when I went on the site to check it didn't come up. If anyone claims this just let me know and I will give credit where credit is due (sorry again).
How cute is this little duck and I know that you think he is too big for the candy wrapper, but he is hiding it, ready for Easter.
My card I did to go with it, and yes I have been sticking with my 3" x 3", I actually like the size as I put a hole at the top and attach it to the gift.
For the card I used Stamp set: Everybunny
Card: Dsp - brights, pumpkin pie, so saffron.
Acc: Pumpkin pie ribbon
The tools I'll put at the end with the whole thing
And my set together, I love my little ducks, so cute....
Tools used: Candy wrapper die, Big shot, scallop circle punch, ornament punch, boho blossom, small oval punch, wide oval punch and 3/4" circle punch.
I sponged all the pieces and drew in the eye lashes with the journal pen and used the white gel pen. The black tear drop eyes were the middle boho blossom punch - two petals cut off in the shape
The feet are different on both ducks as I was experimenting. one set are using the scallop circle and I then used the small oval punch to cut off the shape and the other ducks were boho blossom using the small oval punch to shape as well.
Thanks for stopping by.....
Monday, March 26, 2012
A Bunny Or Not A Bunny, That Is The Question??
Hello,
I don't know what to post today. Oh I just remembered, I told a friend that I would show her what my son and I made the other day, Easter, he was getting all upset because he couldn't get it perfect. Truly you will not be able to tell which one he made but he went off to his room crying. When he calmed down he came back out to finish it off, I think I have a perfectionist on my hands!!! Ohhh I don't think that is very good with craft, as I don't think anything can be perfect and how often do you look at something and think you could have done better! Anyway here is what we made.... Umm, just give me a sec, it is still on my camera!!
This is his that he didn't like, I think it is so sweet.....
This is another one he did and one I did, both those are down the bottom. (He actually didn't like the whiskers!!)
This is the backs of them which we did a bit differently. I have previously made these bunnies here. Sorry, I just went looking for it and couldn't find my post so I will put it up as soon as I find it.
And the little chicks were made here with the directions for the boxes.
Card: Chocolate chip, pretty in pink, whisper white and basic black.
Ink: Journal pen
Tools: 1 3/4" circle, lge oval, sml oval, 1/2" circle, 1 1/4" oval and, eyes and nose are from 2 step owl punch.
thanks for stopping by and have a lovely day....
Saturday, March 24, 2012
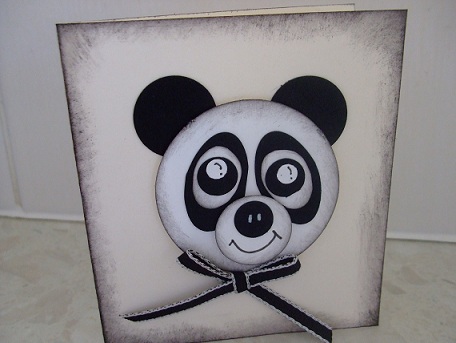
Panda Punch Art Box
Evening all,
I almost went to be without posting but jumped straight back out. I think I have missed enough time lately and I am trying to make up for it. My son has been sick all week so I have had a chance to get a bit done and some craft too, so happy.
Anyway on to our Panda which I cased from Beth yet again. Love her work, truly there are too many brilliant people out there in blogging world.....
Okay, he mightn't look the best on very vanilla, but I was a bit worried about using black and that different parts of him wouldn't stand out. And I used very vanilla because I was worried about not standing out on the white as well, ummmmmmm, gotta try these things!!
How is out there Panda, was trying to do something different with his eyes but he does look a bit..... ummmm, out there!
So my box and card ready to go, don't worry they do look better in reality and at least you will know what not to do.
Once again Beth has instructions on her blog. Tomorrow I will be back to normal and writing as many instructions as possible for you.
Thanks for stopping by.........
Monday, March 19, 2012
Circles, Circles, A Bag and A Card!
Hi,
Oh my, I was just watching Revenge, and gee that show keeps you on the edge of your seat. Don't worry I was cleaning as well, lol. So tonight I wanted to show you what I made for a party, Julie, who was holding the party, wanted to make a bag out of the catty so I made a template of one and cased a circles card from Becky Roberts (fell in love with it when I saw it) and here it is......
I so love these circles and will be doing more. This is one type of bag we did.
And this was a case from the Catty but I actually like the one above more.
The card to go with it...
A close up of the flowers seeing I love them so much
And the two together. Sorry, I haven't written down all the details of the products I have used but just let me know if you would like them. I will get back into putting it up, and if you would like the template of the bag just let me know.
Thanks for stopping by.........
Sunday, March 18, 2012
Monkey Face Fancy Box and Card
Evening,
Another punch art by Beth again and just as adorable though I don't know if mine really captures how cute he is. Again she has the instructions on her blog and easy to follow....
I didn't know what salutation to use so I haven't put one on the card yet. I'll wait and see what I need it for later down the track.
And the gift set altogether. I'm really loving making the card to go with the box or bag.
Another quick post again today. Tomorrow I'll show you what we did at a party I did a while ago.
Thanks for stopping by........
Saturday, March 17, 2012
Giraffe Fancy Box and Card
Evening everyone,
I found another exciting blog and cased Beth's gorgeous boxes, she has all the instructions that are really easy to follow. So tonight I am showing you this very sweet giraffe box and I decided I needed to make a 3" x 3" card to go with it. And here it is.........
Ohhhh, I love punch art, I don't think you can ever have enough punches, lol. Beth used the blossom flower punch which I don't have so I used the 2 step bird punch and just cut down the orange wings to fit inside the yellow ones.
The side of the box, must admit it has taken me awhile to sponge but it does make a difference.
And my 3" x 3" card with dsp from the Sale-A-Bration which is almost over for another year, so get in over the next couple of weeks if you would like some free stamps, dsp or brads and ribbon.
And my set finished ready to give to someone special. Sorry I am short on time tonight and haven't written out everything I have used, if you would like to know, just e-mail me.
Have a lovely evening and thanks for stopping by..........
Sunday, February 26, 2012
How About A Little Chickie For Easter
Hello,
Another overcast but great day today, life can just be so exciting sometimes where you are just so happy to be alive, not that I am always, just some days make you feel like that more than others. Maybe it has to do with people that you have come into contact with during the day. I was talking to a very pregnant friend who took two small children to Chili to live, not knowing anyone, just for the adventure. It was all very exciting talking to her about it, not that I could do it, but never the less it was all very exciting.
So on to my project for the day which is a box with a punch art chicken, which is quite sweet. The chicken is cased from bommoutford, will have to find it again because I just tried to get you a link and can not find that name at all!! Truly some days!!!!!!!!!!! You have no idea how organised I try to be and write down all the names etc to then lose them. Actually one of the reasons why I like to give some simple directions for everything I make is that; I have gone to links from the blog and they have closed down so I miss out on getting instructions for something that looked so cool. Anyway, let me just show you the box from chic n' scratch (she has video on bunny box, which is what I used)
The front of the box
How cute is the back of this box, love it, lol
The person I cased the chicken from actually had a mint pattie (we don't have them in Australia and so far I have only seen them on blogs in the US), but any small chocolate would be good.
And a close up of my little guy.
Box first:
2 pices 7" x 5 1/2" scored 2" on three sides, remembering to keep the length in the box or you could have a squat one! This is where you will need to go over to Angie's blog or just make the box the way you want as she cuts out bits and pieces and adheres them together.
dsp 3 1/4" x 2 3/4", I also cut so saffron 1/4" bigger as I think it needed that behind it.
Stamp set: Everybunny
Card: Very vanilla, dsp - soft subtles, pumpkin pie, basic black and whisper white
Ink: Summer sun
Acc: Bright brads
Tools: 1 3/4" scallop circle, sml oval, 3/4" circle and heart to heart punches
Now for some directions for the chick:
Oval punch -Hand cut shape from oval for the beak.
Scallop circle punch -Take orange scallop and cut into middle, then cut off two pieces with 3 scallops in them, these are the feet. Round off the corners with the corner rounder or by putting it into the circle punch, having the punch facing you.
3/4" circle punch -Sponge 3/4" orange and cut off small piece and attach to bottom of beak
Heart to Heart punch - Use the small full heart (black) cut in half for the eyes and add white gel pen now
Scallop circle punch - Yellow - cut into the circle forming the hair and glue to the back of the face
1 3/4" Yellow circle punch - Face and now you can start adding the bits and pieces to. Also have another cut out for the back which you will need to add more feet to and a tail, hehehe
That is it, thanks for stopping by..........
ps sorry I just went on u-tube again to try and find the chicken, I will keep looking!
Another overcast but great day today, life can just be so exciting sometimes where you are just so happy to be alive, not that I am always, just some days make you feel like that more than others. Maybe it has to do with people that you have come into contact with during the day. I was talking to a very pregnant friend who took two small children to Chili to live, not knowing anyone, just for the adventure. It was all very exciting talking to her about it, not that I could do it, but never the less it was all very exciting.
So on to my project for the day which is a box with a punch art chicken, which is quite sweet. The chicken is cased from bommoutford, will have to find it again because I just tried to get you a link and can not find that name at all!! Truly some days!!!!!!!!!!! You have no idea how organised I try to be and write down all the names etc to then lose them. Actually one of the reasons why I like to give some simple directions for everything I make is that; I have gone to links from the blog and they have closed down so I miss out on getting instructions for something that looked so cool. Anyway, let me just show you the box from chic n' scratch (she has video on bunny box, which is what I used)
The front of the box
How cute is the back of this box, love it, lol
The person I cased the chicken from actually had a mint pattie (we don't have them in Australia and so far I have only seen them on blogs in the US), but any small chocolate would be good.
Box first:
2 pices 7" x 5 1/2" scored 2" on three sides, remembering to keep the length in the box or you could have a squat one! This is where you will need to go over to Angie's blog or just make the box the way you want as she cuts out bits and pieces and adheres them together.
dsp 3 1/4" x 2 3/4", I also cut so saffron 1/4" bigger as I think it needed that behind it.
Stamp set: Everybunny
Card: Very vanilla, dsp - soft subtles, pumpkin pie, basic black and whisper white
Ink: Summer sun
Acc: Bright brads
Tools: 1 3/4" scallop circle, sml oval, 3/4" circle and heart to heart punches
Now for some directions for the chick:
Oval punch -Hand cut shape from oval for the beak.
Scallop circle punch -Take orange scallop and cut into middle, then cut off two pieces with 3 scallops in them, these are the feet. Round off the corners with the corner rounder or by putting it into the circle punch, having the punch facing you.
3/4" circle punch -Sponge 3/4" orange and cut off small piece and attach to bottom of beak
Heart to Heart punch - Use the small full heart (black) cut in half for the eyes and add white gel pen now
Scallop circle punch - Yellow - cut into the circle forming the hair and glue to the back of the face
1 3/4" Yellow circle punch - Face and now you can start adding the bits and pieces to. Also have another cut out for the back which you will need to add more feet to and a tail, hehehe
That is it, thanks for stopping by..........
ps sorry I just went on u-tube again to try and find the chicken, I will keep looking!
Tuesday, January 17, 2012
Fun With Some Friends
Good evening,
Today was spent with some Stampin' Up Demonstrators having fun crafting, eating and talking. Three of the most fun things to do!!!! Well, we certainly had the best time. My card was a Angry Bird 3" x 3" and because I didn't post yesterday I will show you what the other girls had us make as well. I cased my card from Melissa Stout......
Melissa has all the punches on her site but just quickly
Ornament punch - body
1" punch - stomach
2 step owl punch - eyes
cupcake punch - eyebrows
heart to heart - beak
I also used the big shot and strip embossing folder for the fence. The scallop edge punch for the grass and hand cut the clouds out of scraps of white
School books ready for school, well, there is a lot more than this but didn't want to show them all to you.
Now on to the cards we made today....
Sonja's card
Robyn's tag
And lastly Tracey's card, a nice male card, I need to get in and make more of these.
Thanks for stopping by and have a lovely evening.....
Subscribe to:
Posts (Atom)