Thursday, June 30, 2011

Gift With Purchase Promotion

Hi everyone,
Another fabulous deal going on this month and this is a great one for anyone interested in getting that little something extra.  Spend $100 and receive an exclusive product bundle for free -- $31.95 value!  Bundle includes 1/4" white grosgrain ribbon with repeating flower designs approx 1371.6m.  AND 48 flower buttons. 16ea in 3 colours (daffodil delight, melon mambo and pacific point) approx 1/2".  What a deal!!!


Pocket of Cards

Hi everyone,
 I have been trying to post all day yesterday and blogger was playing up, so I'll do another post this afternoon as well.  My last thing to show you from Tuesday with the girls.  Sonja and her chocolate tester (husband) made a template for this gorgeous pocket.  You could work it out yourself but always nice having it done for you.
This is mine
This is Sonja's and now I'll show you the two together:
And I have four different cards to show you that go into my box:


So that is all the cards in the box.  I didn't have any in-colour dsp, only the subtles, but I think the cards would have looked better with the right dsp.
have a lovely day....

Wednesday, June 29, 2011

Pedestal for Cupcakes

Hi,
  Thought I would give you all a surprise and show you another make and take we made yesterday.  Sonja had these especially cut and we just put them together but I will be seeing what I can come up with to give you instructions!!!  Could be hard so we'll have to wait and see:

Aren't they just so cute.  Sonja even put a punch on the table and it held, very stable.  I did have cup cakes there but wanted to take a picture too quickly and missed putting them in but you get the general drift.
have a lovely night....

Tuesday, June 28, 2011

Tueday Play Date

Morning,
  Yesterday a couple of friends came over and we had a play, it was so much fun.  I love crafting on my own, but love it even more when someone else is here to talk to!  Tracey had us make a butterfly card, that are starting to pop up on quite a few blogs at the moment.  It is using the Beautiful butterflies die cut, only just ordered mine at the beginning of the week, can't wait to get it.  Tracey and her Mum, Judy, left early so I can only show you Sonja's and mine.  Tracey thought it would be nice all in white and I agree with her, she did emboss them with vintage wallpaper which have come up really well, you be the judge though:
Mine (love it, love it, love it)
Sonja's, she put some shimmer paint on hers.  She only got it that morning so I think she was very excited and wanted to use it straight away..
The two together, though you really can't see the shimmer mist because of the shadows!
Now I also said I would post my other picture of my spinner card from yesterday.  I made this one for a child's birthday, can never have enough of those!
Love the spinner cards,
have a lovely day....

Slider Monday

Hi all,
  Sorry I have missed a couple of days, start of the holidays and everything changing but I have been busy making so have heaps to show you.  Last night, I did the Monday class over at Crafters Anonymous and made these terrific slider cards, so much fun, though it did take me a while to get it.  I am going to show you a couple:
This is the one I made on the night and thought I could do a lot better.  I did do a bugs and kisses but just realised I forgot to take a photo so I will include it in tomorrow's post.  But here is the one I did today:
I am really loving the purples at the moment, not sure about the card, but I will master it!!  And here is Sonja's card:
Ohhhhhhhhhh.  Looks much better with dsp on the top doesn't it.
Stamp set:  Morning cup
Card:  Very vanilla, perfect plum and dsp - soft subtles
Ink:  Chocolate chip, perfect plum
Acc:  Coins, dimensional
Tools:  Word window punch and 1" punch
thanks for stopping by....

Friday, June 24, 2011

Cute Post-It Notes

Hello,
  Again on Chic 'n scratch I found these post-it notes.  I think they are really sweet and definitely easy to make, especially if you want something a little different and cute for someone.

Sorry, I did not take a picture of them open but how lovely do they look.
Stamp set:  Butterfly prints and pocket silhouettes
Card:  Garden green, very vanilla and some retired dsp
Ink:  Garden green
Acc:  Jewels basic rhinestones and the green ones out of my stash.
Tools:  Eyelet border punch, butterfly punch
Instructions:  Card  -  6 3/4" x 3 1/4  scored at 3 1/4" from both ends (this is to hold half a packet of post-its
3" x 3" dsp, 21/2" x 21/2" garden green and 21/4" x 21/4" very vanilla and decorate as desired
have fun.....

Thursday, June 23, 2011

Owl Box

Hi all,
  I have been on the chic 'n scratch blog and now that I am in my office, making things straight off the computer, oh the fun of it all.  This is a great deep box to put things in, and my picture has not really captured how pretty it really is.
and here it is on the side:
Stamp set:  Forest friends
Card:  Whisper white, dsp - soft subtles, perfect plum
Ink:  Perfect plum and garden green
Tools:  Scallop square punch
Some quick instructions:  2 pieces of 8" x8"
lid:  score      1 15/16" and 6 1/16 and turn and score the same 1 15/16" and 6 1/16"
Bottom:  score    2" and 6",  turn and score the same  2" and 6"
Cut score lines to make the lid and bottom, fit nicely together.
Dsp - 3 7/8" squared for the lid and 4 pces of 3 7/8" x 1 3/4" for the sides, taping these in place and then decorate your lid.
thanks for stopping by....

Wednesday, June 22, 2011

An Easel Card Fit For A Queen

Hello,
Two posts in one day, how is that?  Started this post last night, and the pictures wouldn't upload!!!!!  I finally finished my card from Monday night at Crafters Anonymous.  I was moving my house back into the study, that's right, I spread myself without realising how bad it was.  So now I am working out of my study and it is so much better, only been doing it for a day, so ask me if I am still in here in a months time!
So I finally finished my card and here it is:
This is a big card, so I have also taken a couple of closer photo's of each side.  Anne (from crafters anonymous) put two photos on hers and it looked incredible so that will be my next project.
Now I can start to use up some of my calendars, better late than never!
Card:  Garden green, very vanilla
Ink:   Garden green
Acc:  Jewels basic rhinestones
Tools:  Big shot, butterfly embosslit, elegant lines
have a lovely day....

Tuesday, June 21, 2011

Packet of Seeds

Hi everyone,
  Sorry I have been so slack, my house has need one big tidy and so I have been doing that the last few days instead of craft, ohhhhhhhhhh.  Hopefully I can get to post every day over the holidays.  Today I have this cute little holder for a packet of seeds.  Now I do have instructions somewhere but when I say I have been cleaning, that is so I can get my house back and put all my craft in the study (just a little cramped!)

Sorry, I will try and find who and where I got the instructions.  It is such a quick easy present to give to someone with only a strip of card and a bit of ribbon used.  Stay tuned and I will post details later
Have a lovely afternoon....

Friday, June 17, 2011

My Final Bug -

Hi,
I have a really busy day tomorrow and this is an extra post to finish off my bug collection, aren't they all just gorgeous and isn't Gretchen amazing to have come up with them.  I love my punches and use them more than anything in my collection (shouldn't say that, but I do love my punches and big shot, anything that can be cut out!)  So now for my last little bug:
My bee without wings which is why he looks a little naked.  I couldn't find my vellum.  My office needs a very big clean up, so sorry you have to imagine him with his lovely wings on.
He is looking sad and lonely wanting some friends, so I better give him some:

The whole collection plus some.  I hope you liked them as much as I did making them.
See you on the flip side......

Thursday, June 16, 2011

A Snail's Tale

Hello everyone,
  Oh no, I'm up to my second last one, I feel like calling him Sammy the Snail, don't know why, maybe it is because it rhymes.  I purchased the tutorial from Gretchen Barron, I thought I should say that again even though I am showing one every day (for five days).  So yesterday you got a sneak peak and here it is again:
So we are looking at the yellow face this time for Sammy.

Ohhhh, he is looking a bit scared of us but anyone he has his flower to hide behind.  Now with the shell I again had to use my imagination as I didn't have the big shot die that was required so I used my nestabilities to cut the appropriate size circle.
Again I haven't put up what I used as some of it is retired card and I would hate you to want it and not be able to buy it!!!
Have a lovely day/night.....

Butterfly Basket

Hi all,
My third basket is the cute butterfly.  Gretchen used one of the big shot butterflies but I don't have that die yet so I used my imagination, got to love that!  I halved some A4 photocopy paper and drew half a butterfly on it and then scored some card stock and halved that so I could cut around my sketch and this is what I got:
The purple one is the face I used, sorry didn't realise I took the photo with two different faces.  The other one is for my snail (tomorrow).

Isn't she (too pretty to be a He) pretty.  I also used the elegant embosslit folder to add texture to her wings.  I forgot to mention yesterday but I purchased the tutorial from Gretchan Barron.  One thing I can also say is that I used a piece of card for her hair, just cutting it finely.
have a great evening.....

Tuesday, June 14, 2011

A Worm For You Or Me

Afternoon,
  I'm on early today, so excited to show you the worm, who is a little bit on the dull side, but don't tell him that!!!

Hope you like him, I just love them all!!
Hope you have a lovely afternoon.....

A Bug Is A Bug

Evening,
  I am so excited.  I have had these tutorials for a couple of years and never made them.  I bought them from Gretchen Barron because I loved them so much and just haven't had a chance.  My son is having a bug ball at school and I told his teacher I would make some bugs for her and I couldn't just give her the bugs, so I made the baskets as well.  I have already given them to her but I may have to do some baking so she can fill them up!!
How cute is this ladybird, well here she now is attached to a basket:

Isn't she just so adorable.  I made sure I punched out two of everything as that is the hardest part, punch after punch.  So for this week I will be posting all five, haven't decided what delightful creature you will see tomorrow, I guess you will just have to wait and see....
Card:  Retired stock (garden green, mustard), real red, pretty in pink, whisper white, basic black,
Ink:  Riding hood red
Acc:  Ribbon, dimensionals, glue dots
Tools:  Well there are almost all punches as you can see from the above photo, big shot and basket die which I didn't realise, isn't in the book!
have a lovely evening....

Monday, June 13, 2011

Crafter's Monday Get together

Evening all,
  Another great night on Crafter's Anonymous.  Love my Monday nights.  We made a lovely box that I will be making heaps of as it fits cards in so well.  I haven't made the cards yet, so I will try and get them done tomorrow to show you.  We also made an origami bow that I have showed on my blog before and I never wanted to forget how to do it, but guess what, I did.  I actually had to leave the office to do it in the lounge so I could just get my head around it.  No, that is not me (?????)  If you want the instructions for the box head on over to Crafter's Anonymous or join and come on Monday nights for fun, he he.


Giving you a better view of the bows, the green one is the first one.  I will be practising more now, they are just so cute.
Have a lovely evening....

Friday, June 10, 2011

Gift Card/Photo Album

Good evening,
  Another cold one and my heaters have all been going.  I try to only put them on when I have to but it is far too cold for me.  Tonight I have this gorgeous wallet type gift card holder that I am also saying is an album.  I was thinking of putting in some photos and writing and then a gift card at the end.  This would also make a cool Father's Day present.  I was just going through my stash of notes tonight trying to decide what to make for Father's Day, it is really not that far at all, only a couple of months so I'll start to post some different projects.


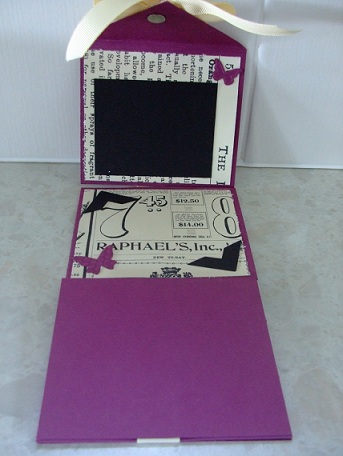
Believe it or not, all the photos are rich razzelberry, the first one looks more red but that is the light I took it in.  I cased this from Paper, Fashions, etc. and really loved the look of it.  Go there and check out the tutorial but here are some quick instructions.
7 pces   31/2" x 4"  Card
1 pce     4" x 55/8"    Card   scored  31/2" and 35/8"
This makes four sections as above, you are decorating one square and then attaching ribbon behind it and attaching a black pce of card, unless you want to decorate it of course.
With you 4 x 55/8 pce you will need to find the centre of the shorter pce and mark 2" in and then cut on diagonal (just the small section) to make the cover for your front.
Decorate the piece you have just cut and add a magnetic closure

Just showing this picture again so you can see. 
Now decorate the next three pces.  And cutting a 16" pce of ribbon, adhere it to the back of one decorate card and then attach a blank pce of card over the top.  Do this with the second pce leaving 1/8" space between card.  Place your other magnetic closure under the ribbon so it will not be seen and then add your card.  I folded mine up to try and make sure I have the magnet in the right place, that is why you need the space as well, so you can fold up the card.  Don't put too much decoration otherwise you will have trouble closing the book.  Decorate the front with more ribbon and you are finished.
Stamp set:  Occassional quotes
Card:  Rich razzelberry, basic black, dsp - newspaper print
Ink:  Basic black
Acc:  magnetic closures, ribbon
Tools:  Big shot, butterfly embosslit and photo corner punch
Have a lovely night.....

Thursday, June 9, 2011

Second Desk Organiser

Hi All,
  Oh my, did we have a cold day today or what?  I know it is winter but we are definitely not use to this.  Every time I walked outside I felt my back freeze, no, not use to this cold and that is why I live in Queensland!  So here is my smaller version of the desk organiser.  I would love to put up the instructions but you really need to see the tutorial to make sure you are cutting all the right pieces:
  Same deal as yesterday with my note paper, little butterflies on them, love the little butterflies and some photo copy paper for quick notes.
Card:  Basic black, whisper white, dsp - newspaper print
Ink:  Basic black
Acc:  Ribbon
Tools:  Big shot, butterfly embosslits
If you would like to make one this size, just let me know and I will do up a tutorial for you,
Thanks and have a lovely night...

Wednesday, June 8, 2011

Desk Organiser

Helloooooo,
  Another day is almost over and I have something for you that I have seen around a bit and love.  So I finally made it and in two different sizes.  I'll show you one size now and the other tomorrow.  SO here it is:

  Ahhhhh, to finally have made it and what a great gift.  Anyone would love this with all the writing paper and notes you put in there and believe me, it fits quite a bit.  I cased this from here, and there is a tutorial, so easy and fun to make.
Stamp set:  Take a sip roller
Card:  Baja breeze, dsp - greenhouse gala and white card and photocopy paper.
Ink:  Baja breeze, watercolour pencils
Acc:  Ribbon, handle for roller, blender pens