Hi all,
Well I have finally got my act into gear to do another post. My Easter tree I promised with the boxes of decorations I have made up, ready to give out next year. Unfortunately I am only showing you two of the five boxes that I made as the other three are still waiting for decorations!!!! I know, but these were very time consuming to make.
Unfortunately not a great photo and the branches were a bit iffy! I have the pink box I previously showed you and one of the new boxes with all the bits and pieces on the tree.
Box number one decorated, I wanted to keep it clean and crisp for Easter.
The flight of the butterflies.
A closer look at the boxes.
The top of the tree.
I know we are a way off Easter but I put so much time and effort into these I just thought I should show you. I have also been busy making presents for friends and teachers so I will be posting those as soon as I can. I try and write directions for everything I do and I do have the box instructions, just not that happy with them but if you would like them just let me know.
Thanks for stopping by and I promise there will be no more Easter creations this year.
Have a lovely night........
Showing posts with label Easter. Show all posts
Wednesday, May 8, 2013
Friday, April 26, 2013
Easter Presents Boxes For The Easter Tree
Hello finally,
I have been busy with back to school and you wouldn't believe it, but I have finally finished off my Easter boxes so I will show you those in the next couple of days. Goodness knows what I have done with the directions but I am not entirely happy with the outcome anyway!
So tonight I am showing you what came inside the box and my very first box and then next time I will show you the five other boxes I have made (all ready for teacher presents for next year) and the Easter tree I decorated though the sticks weren't as good as last time!!
So these are some ovals that I embossed with our folders (because they are eggs that will be dangling off the branches - just in case you couldn't tell!!!) And of course some beautiful ribbon to finish them off.
A different angle, as you can see I love these....
I did put eyelets to help protect the card from tearing even though there are two thicknesses.
my ribbon decoration to weave all over the tree
This is what I did - a flower on the front one and glued them together with the ribbon in between so they would hold nicely.
One more look, because you haven't had enough yet.....
Some flowers from the big flower punch and then some little ones for the middle from the boho blossom punch and I used my paper piercer for the holes and to help push the ribbon through
My butterflies from the bigshot
and some smaller butterflies using the smaller big shot folder
I wanted a couple of smaller flowers so I used the 5 petal punch and this time I didn't use any ribbon, I thought I would put them over some thin branches.
My first box with decoration on the front and using window sheets.
A closer look at the top of the box.
And yet another one.
So finally my box.
Thank you so much for stopping by....
I have been busy with back to school and you wouldn't believe it, but I have finally finished off my Easter boxes so I will show you those in the next couple of days. Goodness knows what I have done with the directions but I am not entirely happy with the outcome anyway!
So tonight I am showing you what came inside the box and my very first box and then next time I will show you the five other boxes I have made (all ready for teacher presents for next year) and the Easter tree I decorated though the sticks weren't as good as last time!!
So these are some ovals that I embossed with our folders (because they are eggs that will be dangling off the branches - just in case you couldn't tell!!!) And of course some beautiful ribbon to finish them off.
A different angle, as you can see I love these....
I did put eyelets to help protect the card from tearing even though there are two thicknesses.
my ribbon decoration to weave all over the tree
This is what I did - a flower on the front one and glued them together with the ribbon in between so they would hold nicely.
One more look, because you haven't had enough yet.....
Some flowers from the big flower punch and then some little ones for the middle from the boho blossom punch and I used my paper piercer for the holes and to help push the ribbon through
My butterflies from the bigshot
and some smaller butterflies using the smaller big shot folder
I wanted a couple of smaller flowers so I used the 5 petal punch and this time I didn't use any ribbon, I thought I would put them over some thin branches.
My first box with decoration on the front and using window sheets.
A closer look at the top of the box.
And yet another one.
So finally my box.
Thank you so much for stopping by....
Wednesday, April 3, 2013
Easter Present
Hello all,
Still working on my project for the Easter Tree and I'm sure it is still a week away. I thought I should show you what a gorgeous someone made for me, for Easter. Thought up the idea all by himself;
Isn't it just the sweetest, there was a little message under the pink oval which is all you need for Easter. I am going to make one myself but I was just amazed at how well he had cut everything out. He did use the wide oval, lge oval and small oval punches. I just love it.
Inside there were lindt chocolate, ummmmmmmm.
thanks for stopping by....
Still working on my project for the Easter Tree and I'm sure it is still a week away. I thought I should show you what a gorgeous someone made for me, for Easter. Thought up the idea all by himself;
Isn't it just the sweetest, there was a little message under the pink oval which is all you need for Easter. I am going to make one myself but I was just amazed at how well he had cut everything out. He did use the wide oval, lge oval and small oval punches. I just love it.
Inside there were lindt chocolate, ummmmmmmm.
thanks for stopping by....
Sunday, March 31, 2013
Easter Tree
Happy Easter for the last time this year. Everything is happening so fast and I luckily enough, missed April Fool's Day. This year is definitely on speed dial. Well I took my pics of my very first Easter tree and stay tuned as I thought it might be a nice gift to make for teacher presents (for next year). I normally make melting moments and put them in a box (I have made) but I think I will mix it up next year. I am going to try and make it over the holidays and do a late Easter post. But for now here is my tree...
I have taken lots of angle pictures as the branches were long and hard to get it all in. I drew a picture of an egg and then cut out four pieces and folded them in half and taped them together with a little bling at the end. I used twine to tie them to the branches.
The eggs are the only paper craft I used on the tree but I will be making a whole paper craft one up to show you.
My family were impressed with my first effort so I can only get better from here.
Happy Easter again and thanks for stopping by...
I have taken lots of angle pictures as the branches were long and hard to get it all in. I drew a picture of an egg and then cut out four pieces and folded them in half and taped them together with a little bling at the end. I used twine to tie them to the branches.
The eggs are the only paper craft I used on the tree but I will be making a whole paper craft one up to show you.
My family were impressed with my first effort so I can only get better from here.
Happy Easter again and thanks for stopping by...
Friday, March 29, 2013
Easter daisies
Hi everyone,
I hope the start of your Easter has been a safe and happy one. Today I am going to show you some Easter daisies that I made. I did them in two different colours to brighten up our room. I'll have to show you the Easter tree I made (tomorrow), loving it!!! But on to today..
Some typical white ones. I punched out some large scallops and then cut them through to the centre leaving enough gap to add the spiral centre.
These ones were done a little differently, I used the largest circle punch and kept the petals further apart, not really sure if I like these ones as much!!
My bunch together in my stunning vase/glass
Thanks for stopping by and have a lovely day....
I hope the start of your Easter has been a safe and happy one. Today I am going to show you some Easter daisies that I made. I did them in two different colours to brighten up our room. I'll have to show you the Easter tree I made (tomorrow), loving it!!! But on to today..
Some typical white ones. I punched out some large scallops and then cut them through to the centre leaving enough gap to add the spiral centre.
These ones were done a little differently, I used the largest circle punch and kept the petals further apart, not really sure if I like these ones as much!!
My bunch together in my stunning vase/glass
Thanks for stopping by and have a lovely day....
Wednesday, March 27, 2013
Beautiful Easter Egg Banner
Hi again,
I have to show you the prettiest Easter Banner I have seen. I love, love, love it. I think I found it on pinterest but here is the link for you. Some of my photos are not so clear but I just had to try and show you them individually. This was so quick and easy to make and I used an old book for the banner and all the gorgeous colours from Stampin' Up. Give it a go and brighten up your room for Easter. I would like to make a Easter Tree and hopefully I can before the weekend. I'll have to see how I go and you will be one of the first to know.
My Easter Banner that till be part of my Easter decorations. Thanks for stopping by and hopefully I will see you tomorrow.....
Oh by the way, she has the pattern on her blog, I made that size and than shrank it down to a smaller one as well.
I have to show you the prettiest Easter Banner I have seen. I love, love, love it. I think I found it on pinterest but here is the link for you. Some of my photos are not so clear but I just had to try and show you them individually. This was so quick and easy to make and I used an old book for the banner and all the gorgeous colours from Stampin' Up. Give it a go and brighten up your room for Easter. I would like to make a Easter Tree and hopefully I can before the weekend. I'll have to see how I go and you will be one of the first to know.
My Easter Banner that till be part of my Easter decorations. Thanks for stopping by and hopefully I will see you tomorrow.....
Oh by the way, she has the pattern on her blog, I made that size and than shrank it down to a smaller one as well.
Monday, March 25, 2013
Punch Art Easter Bunnies With Egg
hello,
I know, it has been so long and I am sorry. Life just got a little hectic for me and I know I have been saying that every time I get on here but I have truly missed coming on. I have made these bunnies before and seeing I had to make so many, 30 (for a class of students) I didn't go all out like I have done before. The funny thing is, it still took me two days (with a few interruptions along the way) to complete them. I had seen on pinterest where someone had put a magnet on the back and I liked that idea so hopefully the kids will take the egg off carefully and keep the bunny.
Don't tell me any different, I want to at least think they will have them for a day!!!
This is them all carefully put in a box ready to go to school, I meant to take a pic before I put them in the box!!!!
Just showing the magnet on the back
And hopefully a clearer picture.
I do have a few other things to show you before Easter so I will get on here again tomorrow night. Thank you for stopping by and have a lovely evening/day.....
I know, it has been so long and I am sorry. Life just got a little hectic for me and I know I have been saying that every time I get on here but I have truly missed coming on. I have made these bunnies before and seeing I had to make so many, 30 (for a class of students) I didn't go all out like I have done before. The funny thing is, it still took me two days (with a few interruptions along the way) to complete them. I had seen on pinterest where someone had put a magnet on the back and I liked that idea so hopefully the kids will take the egg off carefully and keep the bunny.
Don't tell me any different, I want to at least think they will have them for a day!!!
This is them all carefully put in a box ready to go to school, I meant to take a pic before I put them in the box!!!!
Just showing the magnet on the back
And hopefully a clearer picture.
I do have a few other things to show you before Easter so I will get on here again tomorrow night. Thank you for stopping by and have a lovely evening/day.....
Sunday, April 8, 2012
Happy Easter
Wow, how quickly has that crept up on us. Wishing everyone a LOVELY, HAPPY AND SAFE DAY. I had the best day with my family. Cleaned last night and then cooked from 5.30 this morning until my family started arriving at 9am. It was great, managed to get everything made, so we had brunch first and then lunch. But I have something special to show you that a good friend, showed me yesterday. I like to think I am a good baker but I had sponge making lessons and it was great. Here is my first picture, just out of the oven....
I was so impressed, how high is this!!!!!! I made sure everyone saw it. And now on to the decorated version.....
I know what you are thinking! Very plain, but hey, I had spent all morning cooking and this is the best I could muster. I promise it will be better next time. So this is what made my day, my first ever homemade sponge.
Happy Easter xx
Wow, how quickly has that crept up on us. Wishing everyone a LOVELY, HAPPY AND SAFE DAY. I had the best day with my family. Cleaned last night and then cooked from 5.30 this morning until my family started arriving at 9am. It was great, managed to get everything made, so we had brunch first and then lunch. But I have something special to show you that a good friend, showed me yesterday. I like to think I am a good baker but I had sponge making lessons and it was great. Here is my first picture, just out of the oven....
I was so impressed, how high is this!!!!!! I made sure everyone saw it. And now on to the decorated version.....
I know what you are thinking! Very plain, but hey, I had spent all morning cooking and this is the best I could muster. I promise it will be better next time. So this is what made my day, my first ever homemade sponge.
Happy Easter xx
Friday, April 6, 2012
My Second Post For Today - Orange Bunny Carrot
Hello again,
With this post I did not leave myself enough time to make a card so hopefully if I get it made tomorrow, I will show you. Again I have used orange a lot as it is all about carrots!! I have put this little bunny together without really casing from anyone as I have made so many different ones in the past, so it was just putting the punches together and I must say I do like using the ornament punch as the head, so cute.
I really like the petal cone die and I expect I will be using it heaps more now that I have it.
Stamp set: Everybunny
Card: Pumpkin pie, whisper white (sponged), basic black, dsp - brights
Acc: Brights brads
Tools: Petal cone die, Big shot, ornamental punch, lge and small oval punches, wide oval punch, 1 1/4" circle punch, 3/4" punch, 1/4" punch, 2 different size circles from 2 step owl punch and heart to heart punch. The green leafy bit is just strips cut down a piece of card and attached in the centre.
Have a really lovely night and thanks again for popping in.......
With this post I did not leave myself enough time to make a card so hopefully if I get it made tomorrow, I will show you. Again I have used orange a lot as it is all about carrots!! I have put this little bunny together without really casing from anyone as I have made so many different ones in the past, so it was just putting the punches together and I must say I do like using the ornament punch as the head, so cute.
I really like the petal cone die and I expect I will be using it heaps more now that I have it.
Stamp set: Everybunny
Card: Pumpkin pie, whisper white (sponged), basic black, dsp - brights
Acc: Brights brads
Tools: Petal cone die, Big shot, ornamental punch, lge and small oval punches, wide oval punch, 1 1/4" circle punch, 3/4" punch, 1/4" punch, 2 different size circles from 2 step owl punch and heart to heart punch. The green leafy bit is just strips cut down a piece of card and attached in the centre.
Have a really lovely night and thanks again for popping in.......
My First of Two Posts - Today! Easter Bon Bon and Card
Happy Easter everyone,
We spent the day with friends and it was so relaxing and lovely, talk about seafood and lots of it. All very nice and I didn't over-indulge, don't you love that! So this is the first post I will be doing and it is of a gorgeous duck I have been wanting to case for awhile and finally got around to doing it. Sorry I don't have the name as I just took the picture and when I went on the site to check it didn't come up. If anyone claims this just let me know and I will give credit where credit is due (sorry again).
How cute is this little duck and I know that you think he is too big for the candy wrapper, but he is hiding it, ready for Easter.
My card I did to go with it, and yes I have been sticking with my 3" x 3", I actually like the size as I put a hole at the top and attach it to the gift.
For the card I used Stamp set: Everybunny
Card: Dsp - brights, pumpkin pie, so saffron.
Acc: Pumpkin pie ribbon
The tools I'll put at the end with the whole thing
And my set together, I love my little ducks, so cute....
Tools used: Candy wrapper die, Big shot, scallop circle punch, ornament punch, boho blossom, small oval punch, wide oval punch and 3/4" circle punch.
I sponged all the pieces and drew in the eye lashes with the journal pen and used the white gel pen. The black tear drop eyes were the middle boho blossom punch - two petals cut off in the shape
The feet are different on both ducks as I was experimenting. one set are using the scallop circle and I then used the small oval punch to cut off the shape and the other ducks were boho blossom using the small oval punch to shape as well.
Thanks for stopping by.....
We spent the day with friends and it was so relaxing and lovely, talk about seafood and lots of it. All very nice and I didn't over-indulge, don't you love that! So this is the first post I will be doing and it is of a gorgeous duck I have been wanting to case for awhile and finally got around to doing it. Sorry I don't have the name as I just took the picture and when I went on the site to check it didn't come up. If anyone claims this just let me know and I will give credit where credit is due (sorry again).
How cute is this little duck and I know that you think he is too big for the candy wrapper, but he is hiding it, ready for Easter.
My card I did to go with it, and yes I have been sticking with my 3" x 3", I actually like the size as I put a hole at the top and attach it to the gift.
For the card I used Stamp set: Everybunny
Card: Dsp - brights, pumpkin pie, so saffron.
Acc: Pumpkin pie ribbon
The tools I'll put at the end with the whole thing
And my set together, I love my little ducks, so cute....
Tools used: Candy wrapper die, Big shot, scallop circle punch, ornament punch, boho blossom, small oval punch, wide oval punch and 3/4" circle punch.
I sponged all the pieces and drew in the eye lashes with the journal pen and used the white gel pen. The black tear drop eyes were the middle boho blossom punch - two petals cut off in the shape
The feet are different on both ducks as I was experimenting. one set are using the scallop circle and I then used the small oval punch to cut off the shape and the other ducks were boho blossom using the small oval punch to shape as well.
Thanks for stopping by.....
Thursday, April 5, 2012
More Easter Presents
Hello all,
So close to Easter now and all those chocolate eggs, though I must admit I have had my fair share now!!! I forgot to show you what else I made for Teacher presents that they got on the last day before holidays. I always give my son's previous teachers something as well as I appreciate all that they have done and for being a part of my son's life.
I have to make melting moments as everyone loves them, just needed to decorate them.
A close up of my tags
And a better view of the bags.
Tomorrow I will do two posts.....
thanks for stopping by......
So close to Easter now and all those chocolate eggs, though I must admit I have had my fair share now!!! I forgot to show you what else I made for Teacher presents that they got on the last day before holidays. I always give my son's previous teachers something as well as I appreciate all that they have done and for being a part of my son's life.
I have to make melting moments as everyone loves them, just needed to decorate them.
A close up of my tags
And a better view of the bags.
Tomorrow I will do two posts.....
thanks for stopping by......
Monday, April 2, 2012
Sweet Easter Bag Tutorial
Hi,
We are on holidays here for two weeks and it has been the nicest time. Sleeping in, lots of cuddle time and then into the cleaning, though today is all about friends so that gives me some of my time. And I have quite a few Easter things still to show you so I better get going. Here is a little bag that is so sweet and I am pretty sure that I have cased it from Chic 'n Scratch and of course she has tutorials on everything she makes but I have just done up a quick one...
Another picture showing the sides being put together
Bend the sides up to create above look
Put scallop edge card on top and adhere one side down
Tie ribbon around to keep in place or use some other method if you like
Decorate as desired. Front view
Side view
Back view
How easy is that to make and you have enough room to fit chocolates or a little present in.
Stamp set: Everybunny
Card: Whisper white, pink pirouette
Ink: Pretty in pink, chocolate chip and water crayons
Acc: Whisper white ribbon and twine
Tools: Scallop eyelet border punch, small oval and lge oval punches and crop-a-dial
thanks for stopping by......
We are on holidays here for two weeks and it has been the nicest time. Sleeping in, lots of cuddle time and then into the cleaning, though today is all about friends so that gives me some of my time. And I have quite a few Easter things still to show you so I better get going. Here is a little bag that is so sweet and I am pretty sure that I have cased it from Chic 'n Scratch and of course she has tutorials on everything she makes but I have just done up a quick one...
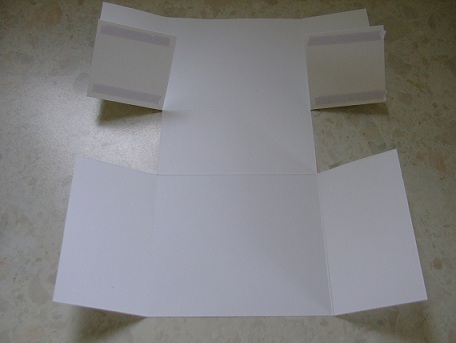
Dsp or Whisper White card 8" x 5 1/2" scored at 2" on 3 sides - 2 long sides and 1 short.
Pink card or Dsp 4 1/8" x 3 1/8" - put through scallop punch on both sides and score in half.
Attach the bottom of box together first - placing one flap over another.
Place adhesive on flaps and sides to adhere together to make bag/boxAnother picture showing the sides being put together
Bend the sides up to create above look
Put scallop edge card on top and adhere one side down
Tie ribbon around to keep in place or use some other method if you like
Decorate as desired. Front view
Side view
Back view
How easy is that to make and you have enough room to fit chocolates or a little present in.
Stamp set: Everybunny
Card: Whisper white, pink pirouette
Ink: Pretty in pink, chocolate chip and water crayons
Acc: Whisper white ribbon and twine
Tools: Scallop eyelet border punch, small oval and lge oval punches and crop-a-dial
thanks for stopping by......
Subscribe to:
Posts (Atom)