Showing posts with label boxes. Show all posts

Monday, February 11, 2013

Valentine Gifts For Friends

Hi all,
I am so sorry I am so slack these days, I keep thinking I will get better but my mind is on work and family and for some reason craft is coming a distant third.  Don't worry it is still on the radar, I just need to move it up a notch.
So how many people are on pinterest, one of my all time go to sites now when I need some inspiration, still love my blogs though.  I seem to be doing more looking than doing but as we know, that can all change in an instant!!
So I have been making some little Valentine gifts to give friends and thought I would share them as it is only a couple of days away now.
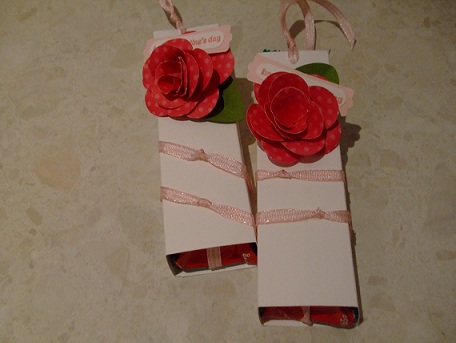
How cute is this, love it.  So far I have only made three but I am going to buy some more tomorrow to do up.  I think a lot of my friends will appreciate this!!
Love the saying that someone made up (I found this on pinterest).  I seriously like you (oh yeah)
Another shot at a different angle.  I so love these.
My son and I have been buying kit kat mint bars (very nyceeeee) so I decided to get a couple to give to a few special friends.  I measured the chocolate and then cut a slightly smaller piece of card to go inside with the ribbon so it can be pulled out.  If you would like instructions just let me know and I will write them up for you.
The roses I had made a while back and posted, thought I would put them to good use....
The bar pulled out so you can see.
A closer view.
Thanks for stopping by and I will try and post again very soon.
Have a lovely day...


Wednesday, December 26, 2012

Post Christmas Gifts

Hello,
Yes I know, I am officially the worst.  I keep saying I will get on here and post every day and I don't, truly I don't know where the time goes.   But I did try and post last night but my camera needed charging so I am sorry but I had to do that today and so here I am.
So I told you I would show you what I received from Angie and what I sent her and here it is....
 This is what Angie gave me and I was so surprised, love opening handmade gifts.  Sorry the photo is a little blurry but I do have individual photos
 A very cute card and of course I forgot to send Angie one (mainly because the world is about me, me and me, lol)
 Not a great picture of the box but I love it
 And of course she cased Becky Roberts and I am so glad she did as I have been wanting to make these and didn't, so thank you so much Ange
 I had to show you a pic with the light on, so cute!
 Yet another blurry photo but the next one is better
 Yes that is right, she sent a box full of Christmas lollies, how lovely is that...
 Oh my, I get a Stampin' Up rubbish bin, I scored big time, thank you so much for making my Christmas that little bit more special Ange x
 Now this is what I sent Ange, I know, it pails in comparison but you have to remember it is the thought that counts, lol.  I tried to trick her by putting it in a shortbread tree box and guess what?  She got me.  I talked to Ange a couple of days after she opened my present and she kept saying she was going to make the tree; and me having a very big blonde moment (No I am not blonde, but should be!!!) didn't get what she was referring to.  I was sitting there on the phone racking my brain trying to think of what I had given her.  I know I had given her angels so I just asked her about them and Ange does not know this;  But Christmas day the penny dropped!!!!!!!!!!!   I know, how bad is that!!!!!!!!!
 I made a box and put four angels inside and thought I would decorate with a couple of tags (don't ask me why, just thought it would be a good idea) and used dotto (which of course I didn't tell Ange and should have) so she could peel them off and re-use them.
 The tag and belly band off with the acetate lid
 One Angel and I cased this off a girl from Stampin' Connections (previously mentioned) but I am still unable to find her name - it will happen.  This time I actually put her collar on (seeing it was for Ange) which did dress the angels up
 Oh I forgot to mention that I used the scallop edge on the green/white angel and on this blue one I used my favourite, scallop trim border.  Sorry, the photo did not show it up as well as I hoped!
 I was proud of myself for lining my box, just for something else!
 Oh, here you go, I have tried to show you the scallop trimming.
 Love this box, quick and easy to make with a little tag (I tried to make sure everything was matching)
 And I had to put some chocolates in there, ummmmmm
 Even though this is the hottest, driest time I can remember, I sent Ange some hot chocolate, though Santa did get hot chocolate in our house too.
 A close up of my little ornament and blinge at the bottom of it.....
And last but not least a little box with some malteezers in there.  I will give you directions on all these.  This box is my next favourite thing and I will be making these for Valentine's day, so sweet.
Well, thank you for popping by and tomorrow I will show you what we gave the teachers.....

Sunday, August 21, 2011

Three Drawer Box

Hi everyone,
I have been attending the classes over at Crafter's Anonymous on a Monday night but haven't had time to finish anything I have been making so I had a couple of hours today to do just that, before I get stuck back into study.  So here is a cute box we made with three drawers to put little pressies or notes into:
I am using BFF's favourite colour (over at Crafter's - Angie) concord crush and I have also used cake crumb which is becoming a favourite.


Very sweet box with lots to add.  Just a couple of different pictures showing you the box open.
Stamp set:  So happy for you
Card:  Concord crush and cake crumb
Ink:  Concord Crush
Acc:  jewels basic rhinestone and craft ribbon
Tools:  Scallop circle punch and boho blossom
have a lovely evening.....

Wednesday, August 10, 2011

Boxes, boxes and more boxes

Morning,
As you may have realised by now I love my 3d and I am going through a box faze at the moment.  Well I found this cute box on you tube with Holly Stampin Mania and thought it was ohhhh so cute.
Now with the ribbon, I put tape on the back of the desired amount and scrunched a little (as you can see from the photo) and then stuck it down.
Sorry this photo is a little blurry but I wanted you to see the side.  It is quite a decent size and can fit quite a bit in.  Holly copied a cream cheese box, so that is the basic size.
Instructions:
8 1/2" x 8 3/4" card    scored (8 1/2")  3/4", 2", 6 1/2" and 7 3/4"
                                   scored (8 3/4")  1 1/4", 5 1/4" and 8"
make into box to look the same as above
4 1/4" x 2 1/2"  dsp
4 1/4" x 1"  (by 2)  dsp
2 1/2" x 1"  (by 2)  dsp
and decorate
have a lovely day.......

Tuesday, August 9, 2011

A Boy Box of Cards

Hi all,
Another night of study, hopefully, I am learning something and it is not all going in and then straight out again.  I have made another box like the one on Saturday but this time I wanted to see if I could just use A4 instead of 12 x 12 and guess what, you can and you don't even have to punch a hole to open the box easier.  You'll see what I mean,

See what I mean, it has left a nice little gap and I actually like it, I like it a lot!!  I could make a hundred of these they were so easy to make.  So give the box a try, so easy.
Stamp set:  Word play (my new all time favourite set and great for scrapbooking - if I was doing it)
Card:  Tempting turquoise, whisper white and dsp - Celebration
Ink:  Tempting turquoise
Acc:  No, there is none, love how the dsp looks like ribbon, don't you!
Tools:  No, no punches today, only cutting.....
Okay, I'm off to bed, have a great one.....

Saturday, August 6, 2011

Yet Another Box of Cards

Morning,
Yes, I have another box for cards, there are so many out there and I'm loving it.  I love to give lots of little presents and this is just perfect to me.  I found this one on you tube (jacque1263), I did go through a fun stage of sitting on there, lasted for a week!  So here is the box;

I know, you would think I would use the stamp-a-magic (he he) and get it straight but I'm in too much of a rush these days.  I friend of mine is playing with black (Angie, on the side bar) and she gave me the inspiration for the cards that I will show you tomorrow!!!
Anyway back to the for a couple of quick instructions.  On thing I have to tell you first, is I ended up cutting half a 3/4" circle in the lid for easier lifting.
12" x 8" card      score  (8)  1" and 7"
                                      (12)   1",5 1/2", 6 1/2" and 11"
Make as per normal box - cut all score marks and tape down, you will automatically have a lid and bottom at the end.  If not e-mail me and I will give more detailed instructions.  Then decorate your box, I liked my decorations until I made the cards (you will have to wait to see what I mean)
Have a great day........

Friday, August 5, 2011

Chocolate Box!

Hi All,
I hope everyone has been having a great week.  Mine has been as busy as ever and I know my posting has been quite erratic and I am sorry about that.  I have a box to show you today and as soon as I find the instructions I will give them to you but I thought I would show you now anyway.  I love the chocolate stamp set and will use it heaps as I know lots of people who are chocoholics!  This is one of the easiest boxes to make, just the decorations that take a little time and the ribbon being tied around it just makes the box.  You can fit so many things inside and then it is an ideal gift box for someone special.

Stamp set:  Eat chocolate
Card:  Chocolate chip, pacific point, riding hood red, baja breeze and whisper white
Ink:  Pacific point
Acc:  Ribbon
Tools:  Big shot, vintage wallpaper and decorative label punch.
Have a great night and I promise to have more tomorrow.....

Tuesday, August 2, 2011

Colourful Box for Cards

Helloooooo,
  Yes, two days in a row, maybe I'll get on a role again!  Today I have a box to show you, perfect for holding cards or a little gift, that is not too wide!!

Oh no, my computer has just gone weird on me again.  So this text could be all over the place but anyway.
Need a piece of card 81/2" x 11"  scored at 71/4" and 8", turn and score the same at the other end
                                                       scored at 73/4" and 81/2"  turn and score the same at the other end
1 pce card 53/4" x 1 3/4" for the matting on the top
1 pce card 51/2" x 1 1/2" for the matting on the top as well
1pce card 53/4" x 21/4" for the bottom of the box then use scallop and oval punch unless you would like something different.  These are just the basic instructions so let me know if you need more.
Stamp set:  Word play
Card:  Pumpkin pie, concord crush, pear pizzazz and chocolate chip
Ink:  Pear pizzazz
Acc:  Ribbon and brad
Tools,  Scallop edge, scallop oval, lge oval and boho blossom punch
have a lovely night and thanks for stopping by..........
  

Sunday, July 10, 2011

Birthday Box and Cards to Make

Helloooo,
  Two of sister's little girls just had their birthdays one week apart and besides giving them a little pressie I made this gorgeous box (sorry the stamp set is not available in Australia) and then cut all the pieces for them to make cards for their friends birthdays.  I used the same stamp but told them they needed to colour them in.  I cased this cute box from Angie Kennedy, been doing that a bit lately but that is because my study is now my craft room and I can look at a video and make at the same time.  Love it!


I coloured with ink and the water pens and made sure they were slightly different so the girls could tell.  The boxes are great as you can fold them down and send them away as well.  The last picture is what I put inside the box for the girls to do - interactive present, he he he.
Card:  So saffron, whisper white, dsp - soft subtles and basic grey
Ink:  Stayzon, various inks for the fairy
Acc:  flower brad
Tools:  Paper piercer and mat pack
thanks for stopping by....

Monday, May 16, 2011

Gable Box and Card

Good afternoon,
  Busy one today so just a quick post.


A gable box and card.  I punched with the word window through the top as I like that look of having an opening.  I actually got the template from our Stampin' Up site but there are heaps around and I'm sure there would be a template on Splitcoast stampers.  If you would like me to get the template and post it, just let me know and I will work on it.  I love the gable box as it is such a cute little box to give away.
Stamp set:  Great friend and
Card:  Pacific point, baja breeze, dsp-celebration and whisper white
Ink:  Pacific point
Acc:  White gel pen
Tools:  Curly label punch, word window punch and scallop edge punch
Thanks for stopping by, tomorrow I am going to show you this great mini criss cross album
Have a great day....

Monday, March 28, 2011

Chest Of Drawers

Hello,
  Yes it is evening, and guess what, I took my first night picture with my camera.  Maybe it is not as bad as I think.  Just joking, I still want a camera that makes everything clear and precise, and where I can focus on something specific.  That is definitely not my camera.  So tonight I did the Crafters Anonymous tutorial on-line and as always it is so much fun.  I always feel the pressure especially when my son won't leave me alone and wants to use the computer.  Easier to give in for peace of mind!  But here is my pictures, not that great but much better than what I was getting.  Sorry I can't give out the instructions but the tutorial is sold on the Crafters Anonymous site.

Stamp set:  Fox and friends
Card:  Tempting turquoise,  dsp - celebrations
Ink:  Old olive
Tools:  Square scallop punch and 1" circle punch
Have a lovely evening....
ps:  do you love what I have done with the page.  Well don't ask me how I did it, my computer was playing up tonight and wouldn't hurry up and download so I started pressing buttons (as you do!!) and this is what I ended up with.....

Tuesday, March 15, 2011

3 x 3 Card Box

Morning,
  We are up bright and early, ready for a busy day.  I love all types of boxes and today I have a 3 x 3 box for you
I am still trying to keep to the Easter theme with my little bunny, even though it is not a traditional Easter box.  I have six cards inside but thought I could also put in a chocolate for Easter.   What is there not to love about Easter!

Just some nice, plain and simple cards.
I'll give you some simple instructions for the box but if you would like me to do a tutorial, just let me know.
Cut 71/2" x 71/2" card      score 2" on all sides.  This is your base
Cut 5 5/8" x 5 5/8"        score 1" on all sides.   This is your lid.
Fold and cut on four score lines to make box and lid, decorate. Like I say, if you would like a tutorial just let me know.  Have a lovely day....