Morning,
I just e-mailed Ariane over at R'n'I for approval to post this tutorial, as this is from her blog. I have loved this basket since the moment I saw it and a friend asked me for instructions so I thought I would do a tutorial myself even though I know it is early to be posting Easter things. After this I will get into the last lot of posts for Valentine. As that will be upon us before we know it, and I have found a few cute little things.
Anyway onto my second tutorial:
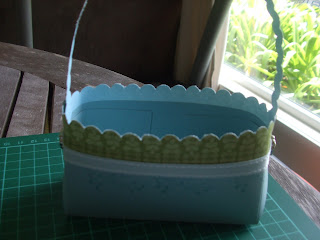
This is the little Easter basket, sorry there are no eggs in there yet, that, is a bit early for me, even though I am a chocaholic, I still need it to be a little closer to the day.
So this is what we need:
1 piece of card 82/8" x 57/8" (half of A4 cardstock) score 57/8" at 3/8"ea side, 21/8
score 82/8" at 11/8",1 15/16",63/8" and 71/8"
1 piece dsp 11/2" x 82/8" (maybe a little longer, as it wraps around the bottom of the basket, and you can
trim of excess later)
1 piece dsp 9/16" x 12" scalloped on one side
1 piece dsp/card scalloped on both sides (I scalloped mine off centre to give that rick-rack look). This is
the handle
Brads, as above.
Cut off all four ends at the score lines. Then draw lines (or use cutter to cut) from outside corner into bottom score line (as next picture)
Hope this is clear enough for you to see where to cut the lines, I did pencil it in but other times I have just used the cutter.
Now you can stamp an image on the card or leave it plain. At the end of the tutorial I will show you one plain and the other with a stamped image on it, purely up to you.
This shows the stamped image using Autumn days, in baja breeze (I didn't want it standing out too much). Now you add tape to the edges, across from each other, as shown. I have already stuck the scalloped dsp (play date) on one side, just to show you and left the other side with tape so you can see to do it on the edges.
After adhering dsp onto edges, tape the middle and place 11/2 x 82/8(or a bit longer) down.
Place tape onto edges, as I have done, ready to make your basket.
Sorry I didn't realise this photo is a bit fuzzy but I want to show you how you need to bring up the edges to meet in the middle. You need to do this on both sides.
This is what your basket will now look like, before we add the handle (with brads). I also added some retired ribbon on this one as well. The brads I used are the designer brads (love them so much, I haven't used them before!!!)
And here is the picture of the one without ribbon and a stamped image.
I just realised how plain this looks in the photo. Really it looks better in real life...... believe me, it does, lol.
rubrnink has a great tutorial on her site if I haven't explained myself clearly enough. She has also done it in cm where mine is inches.
Thanks so much for popping by and I hope you like the Easter basket as much as I do...
Have a great day..


No comments:
Post a Comment