Friday, March 29, 2013

Easter daisies

Hi everyone,
I hope the start of your Easter has been a safe and happy one.  Today I am going to show you some Easter daisies that I made.  I did them in two different colours to brighten up our room.  I'll have to show you the Easter tree I made (tomorrow), loving it!!!  But on to today..
 Some typical white ones.  I punched out some large scallops and then cut them through to the centre leaving enough gap to add the spiral centre.
 These ones were done a little differently, I used the largest circle punch and kept the petals further apart, not really sure if I like these ones as much!!
My bunch together in my stunning vase/glass
Thanks for stopping by and have a lovely day....

Wednesday, March 27, 2013

Beautiful Easter Egg Banner

Hi again,
I have to show you the prettiest Easter Banner I have seen.  I love, love, love it.  I think I found it on pinterest but here is the link for you.  Some of my photos are not so clear but I just had to try and show you them individually.  This was so quick and easy to make and I used an old book for the banner and all the gorgeous colours from Stampin' Up.  Give it a go and brighten up your room for Easter.  I would like to make a Easter Tree and hopefully I can before the weekend.  I'll have to see how I go and you will be one of the first to know.


My Easter Banner that till be part of my Easter decorations.  Thanks for stopping by and hopefully I will see you tomorrow..... 
Oh by the way, she has the pattern on her blog, I made that size and than shrank it down to a smaller one as well.

Monday, March 25, 2013

Punch Art Easter Bunnies With Egg

hello,
I know, it has been so long and I am sorry.  Life just got a little hectic for me and I know I have been saying that every time I get on here but I have truly missed coming on.  I have made these bunnies before and seeing I had to make so many, 30 (for a class of students) I didn't go all out like I have done before.  The funny thing is, it still took me two days (with a few interruptions along the way) to complete them.  I had seen on pinterest where someone had put a magnet on the back and I liked that idea so hopefully the kids will take the egg off carefully and keep the bunny.
Don't tell me any different, I want to at least think they will have them for a day!!!

 This is them all carefully put in a box ready to go to school, I meant to take a pic before I put them in the box!!!!
 Just showing the magnet on the back
And hopefully a clearer picture.
I do have a few other things to show you before Easter so I will get on here again tomorrow night.  Thank you for stopping by and have a lovely evening/day.....

Monday, February 11, 2013

Valentine Gifts For Friends

Hi all,
I am so sorry I am so slack these days, I keep thinking I will get better but my mind is on work and family and for some reason craft is coming a distant third.  Don't worry it is still on the radar, I just need to move it up a notch.
So how many people are on pinterest, one of my all time go to sites now when I need some inspiration, still love my blogs though.  I seem to be doing more looking than doing but as we know, that can all change in an instant!!
So I have been making some little Valentine gifts to give friends and thought I would share them as it is only a couple of days away now.
How cute is this, love it.  So far I have only made three but I am going to buy some more tomorrow to do up.  I think a lot of my friends will appreciate this!!
Love the saying that someone made up (I found this on pinterest).  I seriously like you (oh yeah)
Another shot at a different angle.  I so love these.
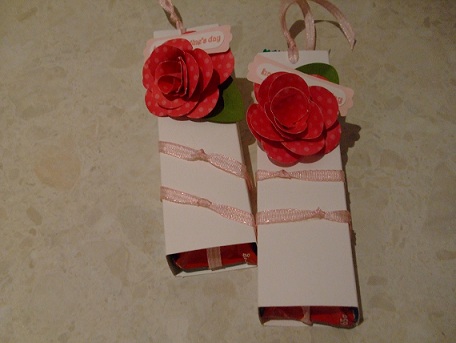
My son and I have been buying kit kat mint bars (very nyceeeee) so I decided to get a couple to give to a few special friends.  I measured the chocolate and then cut a slightly smaller piece of card to go inside with the ribbon so it can be pulled out.  If you would like instructions just let me know and I will write them up for you.
The roses I had made a while back and posted, thought I would put them to good use....
The bar pulled out so you can see.
A closer view.
Thanks for stopping by and I will try and post again very soon.
Have a lovely day...


Saturday, January 19, 2013

Valentine Window Box

Hello,
We have had another hot day today but at least there was a lovely breeze.  So today's post is a Valentine box that was made to go with this envelope card (where I can also put quite a few pictures - I have posted this one earlier).  I have been going through my stash and making that something extra to go with previously made things.  I followed a tutorial for this from Gretchen Barron, dated back in October 2001.
 The front view with heart cup and heart tags
 The back view, I have a ribbon wrapped around a brad to keep it closed.  All four flaps folded down and I wanted to do something extra with them....
 Top has a flower on top for my Mum
 Open the first flap and there is somewhere to write or put a little picture
 Second flap up and another place for photo or message
The last flap I left bare and used a 3/4" circle punch to punch half a circle to lift flap easily.  So now I just need to get the photos together over the next few weeks.
thanks for stopping by.......

Wednesday, January 16, 2013

Back to School Chocolate Pencils

Hello,
My computer is playing up again today, I suppose it is a couple of years old now!!!  I was going to show you another Valentine project I made but it is also only another couple of weeks away for school so I thought I would make my son's teachers (ex and present) a present.  I have seen these on heaps of blogs, starting off with Lorri's blog and then on Pintrest.
I had a friend come and play for the day and this is one thing she wanted to make (as she had seen them on Pintrest and loved them too) so I finally got to make these and every child that has come into my house has picked them up and wanted one.  I swear they will go to school with lots of dirty finger prints on them!!
The bottom one is my first attempt with a milky way bar, just had to make one before my friend got here.  Then she bought dairy roll ups and kisses and then we had some fun.
I rolled the chocolate on a ruler to see how wide I needed to make it (just in case yours is a different size). These worked out :-
yellow card - 5 1/4" x 3 1/8" or 12 1/2cm x 8 cm, put some score marks on it as that makes them look cool
pink card - 1 1/2cm x 8 cm and sorry I forgot to work out how many inches that was but the 3 1/8" is equal to 8 cm. Don't score this one as that is the rubber.  I then used a 3/4" punch for the bottom.  I used the glue gun to hold this all together.  Then of course the Hershey kiss on the tip and I made some little tags and a glitter love heart on them.
thanks for stopping by and have a good one....

Tuesday, January 15, 2013

Valentine Heart

Hello,
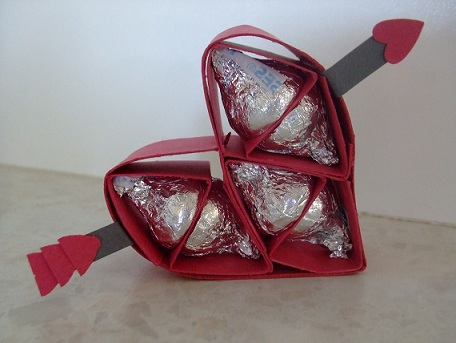
I am going to show you the most gorgeous heart today.  Brenda (Qbees Quest) came up with these.  I really wanted to make the Christmas tree she designed as well and I did make it, just couldn't find any chocolates to fit in there.  Well I could make the hearts because we now have Hershey kisses here in Australia, in Woolies.  I love our chocolate heaps more but unless you're going to sit there and make heaps of drops the easier option is to buy a packet of kisses.  So here is my cute heart, did make half a dozen, just forgot to take a picture of them all....
These are so incredibly easy to make so pop over to Brenda's blog where she has a great tutorial to follow.
Thanks for stopping by and have a lovely day....