Saturday, September 29, 2012

A Stick Christmas Tree, Well Sort Of!!!

Hello,
I missed my post last night, went to bed early instead so thought I would get it off this morning.  And just for something different it is...
another Christmas tree.  I have been trying to make as many different, easy trees as possible.  Though I must admit I don't have any more made at the moment, will see how I go today if I can push myself to get some done.  And I love the presents under the tree, they just finish the card off nicely.
Stamp set:  Snow swirled
Card:  Whisper white, cherry cobbler, chocolate chip and dsp - be of good cheer
Ink:  Cherry cobbler
Acc:  Star brad
Tools:  Paper piercer.
Thanks for stopping by and have a great day.....

Friday, September 28, 2012

Season's Greetings and Merry Christmas

Hi there,
Another day in a row, I am even impressed with myself.  Though I will have to get some crafting done tomorrow so I have more to post next week.  So what shall I show you today, I know, a Christmas card, hehehe...

I so loved making these cards, just so easy to make.  Cut out a square and cut on the diagonal and adhere together.  I will be making heaps of these.
Stamp set:  Snow swirled and Wacky wishes
Card:  Whisper white, cherry cobbler, gumball green and dsp - be of good cheer
Ink:  Gumball green and cherry cobbler
And that is it my hearties, have a lovely night and thanks for stopping by....

Thursday, September 27, 2012

Another Halloween Slider Box and Surprise

Hi, hope everyone has had a lovely day (or having one).  So I was trying to work out what to post tonight, another Halloween or another Christmas card but I think I will show you another Slider Box but a different size and different surprises inside...
 I know it seems like there is a lack of decoration on the front but you have to remember it is Halloween, lol
 See my little spider popping out, just had to show you that
 And these groovy mouse traps that I saw on Stampin' Connections (a Stampin' Up website for demonstrators, which I absolutely love).  Renee Coburn is the lady that I cased and I am so happy she made these, what a great present to give to a friend !!!, lol
 I love the look of these traps and I have a couple more to decorate but I must admit they were driving me crazy when I was making them, lots of little bits to cover with the dsp, I was gritting my teeth through some of it.
And my finished box with a couple of 3" x 3" cards to go with it.  I am so going to enjoy Halloween this year.
So for directions for the box check out my previous instructions (two nights ago) but you will need to change the size of the box and here that is,
Box:  7 1/8" x 8 3/8"  scored at 1 1/4" down both ends and use corner rounder on all four edges (7 1/8")
                                   scored at 3 1/2" and 4 3/4"
Lid:  7 1/4" x 8 1/4"  scored at 1 1/4" down two ends  (7 1/4")
                                   scored at 3 1/2" and 5 1/4"
Stamp set:  Hostess Wacky Wishes (I am going to get so much use out of this set) and googley ghouls
Card:  Basic black, retired dsp and very vanilla
Ink:  Basic black
Acc:  Mouse traps
Tools:  Big shot, labels collection framlits, modern label and word window punches
thanks for stopping by...

Wednesday, September 26, 2012

Easy Peezy Christmas Tree

Hi,
It is a little past my bed time but seeing I am on a roll I wanted to try and stay on it, so just a small post tonight of another Christmas card.  I have been very impressed with myself in being organised this year (with my cards), so here it is..
Another Christmas tree and one of my favourites, looks better here anyway.
Stamp set:  Hostess and I have forgotten (I tell you way past my bed time)
Card:  Gumball green, chocolate chip, cherry cobbler and dsp - be of good cheer
Ink:  Gumball green
Tools:  Word window punch
And that is so easy, love it.
Thanks for stopping by....

Tuesday, September 25, 2012

Halloween Slider Box, Bookmarks and Chocolate

Hi all,
So tonight I promised Halloween.  Gee I love this time of year, so much fun.  And here is what I have been making, well one of the things I have been making!!....
 I have been wanting to make these boxes for ever and it is a slider box, I have made them in three different sizes which I will be showing you over the next few days.  Even though I made the box a few days ago, it was only yesterday that I decorated and made the cute bookmarks.  I thought I could give this as a gift to a friend or keep it myself and when the kids come around trick or treating, I could give them a bookmark.  Just imagine how popular I will be, hehehe
 Obviously the chocolate will have to be for me, lol.  How well do this bookmarks sit in here.  I made them 11/2" by 51/4".
I had to put a green Frankenstein on the front of the box even though the photo at the top doesn't have it, just thought it needed another touch.
Stamp set:  Googly ghouls
Card:  Basic black, very vanilla and dsp - retired
Ink:  Basic black and cherry cobbler
Tools:  Big shot, labels collection framelits, modern label and word window punch.
Now I am sure you are going to want some quick instructions on making the box so here it is:
Bottom:
Card 8 1/8" x 9 5/8"  scored at 1 1/4" down each long side and round all four corners.
                                  scored at 3 1/4" and 4 1/2"
Cut to where the score lines meet and adhere tape to make box
Lid:
8 1/4" x 10 1/4"  scored at 1 1/4" down each long side
                            scored at 3 1/2" and 5 1/4"
Cut to where the score lines meet and adhere tape and make lid
Decorate as desired.
Any problems or if you would like a tutorial please just let me know.
thanks for stopping by........

Monday, September 24, 2012

Merry Christmas with Snow Swirled

Hello,
Another day and another Christmas card!!
I have made a lot of the cards on Very Vanilla or Whisper White at the moment (I really like the look and I think it is a faze I am going through).  I love the Snow Swirled set and am glad there is at least one of my Christmas sets still in the new catalogue.
Stamp sets:  Snow swirled and Teeny tiny sentiments
Card:  Very vanilla, cherry cobbler and dsp - be of good cheer
Ink:  Cherry cobbler
Acc:  Pearl basic jewels and Very vanilla seam binding ribbon
Tools:  Word window and modern label punch
Tomorrow I will have a Halloween project for you, yes I have finished decorating a few of those boxes and adding something inside of them.  You'll just have to wait until tomorrow to find out what it is, lol.
thanks for stopping by.....

Sunday, September 23, 2012

Snow Flurry Christmas

Hello,
Well you will be very surprised to know that I have been busy crafting.  Work has settled down and I now have a bit of time to get back into my stamping.  I have made quite a few Christmas cards (yes cards!) and boxes and I have to finish off a lot of different mini albums and boxes for Halloween.  Just need to do the decoration, they are all constructed and will be ready to go by the end of the week.
So what to show you first, ummmmmm.......  a card.....
I was also waiting on some of the new catalogue goodies to arrive.  One of my favourites is the snow flurry die and I have been putting it to some good use.  Don't look too closely at my dsp as I didn't and my trees are upside down.
Stamp set:  Teeny tiny sentiments
Card:  Very vanilla, cherry cobbler and dsp - be of good cheer
Ink:  Cherry cobbler
Acc:  Gold brad
Tools:  Big shot and snow flurry die, modern label punch and word window punch
thanks for stopping by........

Wednesday, September 5, 2012

Easy Brag Album

Evening everyone,
I am very frustrated as I have been searching u-tube to find the album, I am going to show you tonight but I didn't add it to my favourites and unfortunately I didn't write down the name!!!  I get so mad at myself and can't believe I keep doing it.  I use to print out a lot of information but now I make the basic while I am on the net and finish it off later, hence my inability to remember to write down information!!
I found it on u-tube, so I will continue to look but if you see something similar can you please let me know and I will be able to put it on this post, where I first saw it.
Guess what?  I just found her, you will love her tutorial, I am so happy.  Here is the link to Stephanie Miller, My prima place.  Now I can go to bed happy.  Thank you for putting up with me, lol.
So on to my boy album....
 The front using lots of the stickers from Simply Scrappin' Country Club which I bought a couple of months ago and only now got around to using.
 Sorry the photo is a little fuzzy but I promised to post tonight and I don't have time to take some extra pictures.  I have put lots of places for extra writing and pictures.
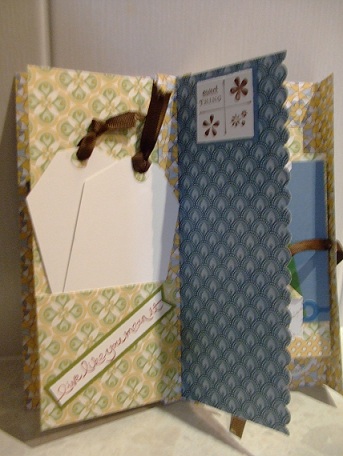
 This is the same page with the flap open.
 A couple of tags with decoration on the bottom, forgot to take those ones out!
 I have finally got to use the Sweets for the Sweet stamp set and will get it out more often over the next couple of months.  More tags in a pocket.

 Another page and another insert to add extra photos/journalling
I have never been big on printed paper on printed paper but I am starting to like the concept, little by little.
So now some quick instructions for you.  (I plan on making lots more but there are a couple of stamp sets in the new catty that I will need first).
7 1/2" x 12" dsp and score at 31/2", 4", 41/2", 5, 51/2", 6", 61/2", 7", 71/2" and 11", 111/8" and 11 1/4"  -  accordion fold leaving the 31/2" as your front.
Tape the accordion folds together from the back.
Make some pages to go in the accordion folds leaving a slight border, I made mine 31/4" x 71/4" with one much smaller (the back one in this book).
Decorate as much as you would like.
I will make a tutorial as soon as I can track down the person I copied this from, she was amazing.
Thanks for stopping by and have a good night..... That's right, I have found her, so if you would still like me to make a tutorial, just let me know..

Tuesday, September 4, 2012

Scallop Envelope Mini Album

Hi everyone,
Well I have finally finished the album but I can't show you tonight as I have taken the photos but need to re-charge my batteries.  I tell you that was some hard work!  It has been a long time since I have made and decorate a mini album and my mind went into overdrive.  And it was for a boy, funny how you keep looking at all the flower punches and die cuts!!!!
So tonight I have a different type of album to show you (yes, I am on an album roll at the moment) and this one is using the scallop envelope die.  I have found quite a few on different blogs and if you would like me to do a tutorial, just let me know.
 I am making this one into a Christmas album (as you can no doubt tell!) to give to a family member.  All the tags pull out and can be used for journalling or photo's.  I have used one of my favourite retired dsp's.
 Oh, the sale-a-bration dsp also went well with the Christmas theme, got to love that!
So I finally got to make a journal and there are plenty of sites to case from, so give it a go, or if you are like me, you have so many projects you want to make that it all gets put on the back burner!!  So drop around tomorrow for the accordion fold mini.
Have a lovely evening.........

Sunday, September 2, 2012

Decorated Journal

Good evening,
I have been busy today working on a mini album and can you believe I made it on non Stampin' Up supplies (just wanted to get a feel for it), so I will endeavour to make another in Stampin' Up products.  I just wanted to see how it would go and I tell you there is a lot of decoration needed.  Don't worry I will work as hard as I can to show you as quickly as possible.
Tonight I have a journal I have decorated.  I have seen a lot of notebooks and diaries decorated on different blogs and on u-tube and I think it was on Lorri's blog (on my side bar - confessions of a stamping addict)where she made tabs for different subjects and I really liked that.  So this is what this one is about but also writing a little message for the recipient and putting in a couple of photo's.


Thank you for stopping by and have a lovely night/day......

Saturday, September 1, 2012

Tiles Turned Into Coasters

Hello,
I know, I'm not going to say anything except hello.
On the net at the moment I have seen a lot of decorated tiles and have been wanting to try them myself.  With Father's Day coming up I decided to give it a go, and I love it.  They are so easy to make, you have to try it.  I have used retired dsp and the next couple of projects are the same.  I am trying, still, to use up my stash!
I thought this was very appropriate paper for my Dad and Mum, not too flowery for Dad and not too masculine for Mum.
To make the tiles I cut out my dsp making sure I left a slight border so you could see the terracotta tile background.  Using mod podge coat the tile and place on dsp, coat with mod podge over the paper and allow up to 15mins to dry.  Add three to four coats of sealer to protect the tile.  And that is how easy they are to make.  I also just watched a video on u-tube where the demonstrator used crystal effects to seal the tile.  I haven't tried that so I am not sure how that would go with the hot cups or watery cold ones.  So have a go and have a few on hand for those presents that you need to grab without notice!!  Yes, that happens to me a lot!!
Thanks for stopping by and have a great weekend.....